About Monkey 2 › Forums › Monkey 2 Programming Help › Converting color
This topic contains 9 replies, has 5 voices, and was last updated by ![]() dominique95 1 year, 1 month ago.
dominique95 1 year, 1 month ago.
-
AuthorPosts
-
March 11, 2018 at 7:21 am #13955
So I’m totally stuck after few days think about this problem. It’s a really tough problem.
How would you convert the color from RGBA Uint into a “color” datatype?March 11, 2018 at 7:41 am #13956Monkey1234567891011Function ToRGBA:UInt( c:Color )Return UInt(c.R*255) Shl 24 | UInt(c.G*255) Shl 16 | UInt(c.B*255) Shl 8 | UInt(c.A*255)EndFunction FromRGBA:Color( rgba:UInt )Local r:=(rgba Shr 24 & $ff)/255.0Local g:=(rgba Shr 16 & $ff)/255.0Local b:=(rgba Shr 8 & $ff)/255.0Local a:=(rgba & $ff)/255.0Return New Color( r,g,b,a )EndMarch 11, 2018 at 12:16 pm #13958But how to set the colour to full or no alpha rrggbbaa so you can ERASE “color” an OVAL?
I just don’t understand how alpha is put in color, how to erase? is there a MODE for that?March 11, 2018 at 12:36 pm #13959Is it kosher to use canvas.BlendMode = BlendMode.Opaque to set the absolute value of R G B *and Alpha* of a pixel?
March 11, 2018 at 8:19 pm #13967Yeah, the alpha is just a color channel, like red, green or blue.
You can set is as part of the color, or separately using “canvas.Alpha = myAlpha”.Also remember that in openGL colors can have values higher than 1.0 – that’s HDR! Setting colors like that is essential to things like Glow shaders. It’s probably a good practice to not use UINT values of 0 to 255 unless you need to, and embrace colors as floating point values.
This:
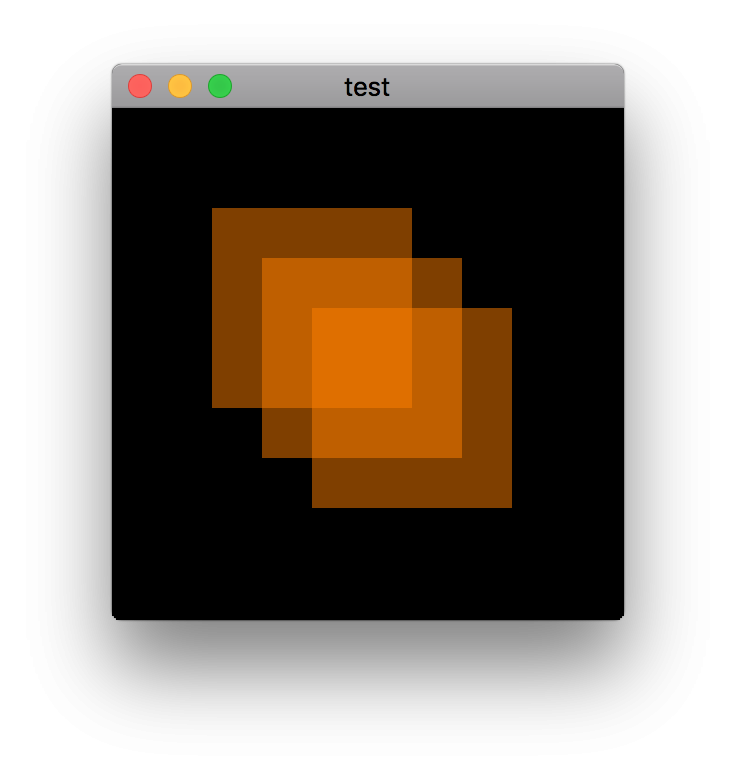
Monkey1234567891011121314151617181920212223242526272829303132Namespace myapp#Import "<std>"#Import "<mojo>"Using std..Using mojo..Class MyWindow Extends WindowMethod New()Super.New( "test",512, 512,WindowFlags.Resizable | WindowFlags.HighDPI )EndMethod OnRender( canvas:Canvas ) OverrideApp.RequestRender()canvas.Color = New Color( 1, 0.5, 0, 0.5 )canvas.DrawRect( 100, 100, 200, 200 )canvas.DrawRect( 150, 150, 200, 200 )canvas.DrawRect( 200, 200, 200, 200 )EndEndFunction Main()New AppInstanceNew MyWindowApp.Run()EndWill output three overlapping squares with transparency, like this:
 March 11, 2018 at 8:24 pm #13968
And if by “Erase” color you mean to make a color in an image transparent… that’s really not necessary anymore, simply export images as PNG files with transparency.
If you already have old images you’d like to use and you don’t want to change them using a graphics app… I guess you can make a monkey module that loads an image as a pixmap, specifies a color to be made transparent, finds all pixels in the pixmap that match that color and sets the color in those pixels to transparent and creates a new image from that pixmap…
…or you can just save the images as PNG with transparency!
 March 12, 2018 at 3:38 am #13971
Wow, big thanks, good to know !
But what happens if you wants to change only the alpha but you want to keep the rest intact? Do you have to make it pixel by pixel or is a way to change alpha channel alone?March 13, 2018 at 8:07 am #13995Just give the canavas some drawing color and the whole image will be drawn with that modified color.Note that you are supposed to use premultiplied alphas in mx2 (I think, not really sure of when to deal with premultiplied alphas).
Monkey12canvas.Alpha=0.5)canvas.DrawImage(myImage,100,100)or directly on the Image
Monkey123myimage.BlendMode=BlendMode.Alpha 'the default blendmode..myimage.Color=New Color(0.5,0.5,0.5,0.5)March 13, 2018 at 3:44 pm #14006When you draw to canvas, you blend pixels with existing ones.
The question is how to erase pixels in canvas.
It’s actual to make transparent HUD for AR-glasses stuff, when you need to make drawing area actually transparent to see through it.
I remember there was a similar topic but don’t remember the answer – is it possible or is it in TODO.
March 17, 2018 at 7:33 pm #14053For creating Hud , I start with erased image, canvas.Clear(Color.None) and draw with BlendMode.Alpha
and adjust the Alpha component of the drawing color.
In the main loop , I draw this image on the screen. But it’s always the same.Try this , using A, D, M, O, and Up/Down Keys.
See the Color’s info under the mouse, blendmode will make sense.
Transparency is where you see the red balls.
Coded with Monkey2 1.1.06Monkey123456789101112131415161718192021222324252627282930313233343536373839404142434445464748495051525354555657585960616263646566676869707172737475767778798081828384858687888990919293949596979899100101102103104105' ---------------------------------------' alphatest2.monkey2' ---------------------------------------Namespace alphatest2#Import "<std>"#Import "<mojo>"Using std..Using mojo..Class MyWindow Extends WindowField pxm:PixmapField img:ImageField imgcanvas:CanvasField opacity:FloatField blmode : BlendModeField blmodename : StringMethod New()Super.New( "test",512, 512,WindowFlags.Resizable | WindowFlags.HighDPI )pxm = New Pixmap( 300,300,PixelFormat.RGBA32 )img = New Image( pxm,TextureFlags.None,Null )imgcanvas = New Canvas(img)opacity = 0.5blmode = BlendMode.Opaqueblmodename = "Opaque"EndMethod OnRender( canvas:Canvas ) OverrideApp.RequestRender()' Draw your Screen background here (Red Circles)canvas.Clear(Color.Black)For Local lc:Int = 1 To 8For Local li:Int = 1 To 6canvas.Color = Color.Redcanvas.DrawCircle( lc*55,li*55,25 )NextNext' Adjust Opacity and BlendModeIf Keyboard.KeyPressed(Key.Up)opacity = Clamp( opacity+0.1,0.0,1.0 )Elseif Keyboard.KeyPressed( Key.Down )opacity = Clamp( opacity-0.1,0.0,1.0 )Elseif Keyboard.KeyPressed( Key.A)blmode = BlendMode.Alphablmodename = "Alpha"Elseif Keyboard.KeyPressed( Key.O)blmode = BlendMode.Opaqueblmodename = "Opaque"Elseif Keyboard.KeyPressed( Key.M)blmode = BlendMode.Multiplyblmodename = "Multiply"Elseif Keyboard.KeyPressed( Key.D)blmode = BlendMode.Additiveblmodename = "Additive"Endif' Draw orange squares into image according to params (opacity and BlendMode)' These 9 next lines dont have to be in you main loopimgcanvas.Clear(Color.None) ' Clear the image And Alpha = 0.0imgcanvas.Color = Color.Blue' And paint bottom half in blue and Alpha = 1.0imgcanvas.DrawRect(0,0,pxm.Width,pxm.Height/2)imgcanvas.Color = New Color( 0.9, 0.4, 0.0, opacity )imgcanvas.BlendMode=blmodeimgcanvas.DrawRect( 50, 50, 100, 100 )imgcanvas.DrawRect( 75, 75, 100, 100 )imgcanvas.DrawRect( 100, 100, 100, 100 )imgcanvas.Flush()' Try the results without cheatingcanvas.Color = New Color( 1, 1, 1, 1 )canvas.Alpha = 1canvas.DrawImage( img,0,0 )' Show Pixels dataLocal ARGB:UIntIf (Mouse.X<pxm.Width) And (Mouse.Y<pxm.Height)ARGB = pxm.GetPixelARGB(Mouse.X,Mouse.Y)canvas.DrawText( "image color ARGB $" + Hex(ARGB),0,Height-40 )Endifcanvas.DrawText( "Move the mouse pointer",0,Height-70 )canvas.DrawText( "See alpha component (left 2 bytes) of the",0,Height-56 )' opacity and BlendModecanvas.DrawText("Opacity " +opacity,Width-150,Height-70 )canvas.DrawText(blmodename,Width-150,Height-40)canvas.DrawText( "Up Down keys",Width-150,Height-56 )canvas.DrawText( "A D M O keys",Width-150,Height-28 )EndEndFunction Main()New AppInstanceNew MyWindowApp.Run()End -
AuthorPosts

You must be logged in to reply to this topic.