About Monkey 2 › Forums › Monkey 2 Programming Help › [mojox] How to set the position of the Window and an Dialog?
Tagged: mojox
This topic contains 1 reply, has 2 voices, and was last updated by ![]() abakobo
abakobo 5 months, 2 weeks ago.
-
AuthorPosts
-
November 5, 2018 at 1:57 pm #15562
How to set in mojox the position or location of the Window and an Dialog?
MyWindow.Left = 17
MyWindow.Top = 25
MyWindow.Position(14,20)
MyWindow.Location(14,74)all don’t help. Same with an Dialog.
Greetings
theuserblNovember 6, 2018 at 8:17 am #15563The Window is your app window. It’s coordinates would be how it appear in the OS screen. Is it what you want to define? I dont’t think it is implemented in mojo/mojox. The Windows just center themselves in the OS screen. With mojox you’ll use Views
You can find small examples in modules/mojox/tests
And here is some forum discussions that could help you.
Unfortunately mojox really lacks of documentation. There was a bit more at a time but it disapeared from the docs!
The mojox module.
The mojox module provides a simple but highly customizable gui system, built on top of mojo. Mojox also uses ‘auto-layout’ as much as possible, so you don’t generally have to provide location/size of widgets, and can easily change fonts, skins etc without having to manually ‘re-layout’ your gui.
Much of the core functionality of mojox is actually implemented in the mojo module by the AppInstance and View classes. The View class is the base class of all ‘widgets’ in mojo/mojox (including the mojo Window class), and mojox really just provides a set of useful view subclasses that provide buttons, text views, dialogs etc.
Views are stored in a simple ‘tree’ structure, where each view has an optional parent, and 0 or more children.
View styleEach view also has a ‘style’, which may be shared with other views of a similar type. A view’s style contains information that affects its layout and rendering including:
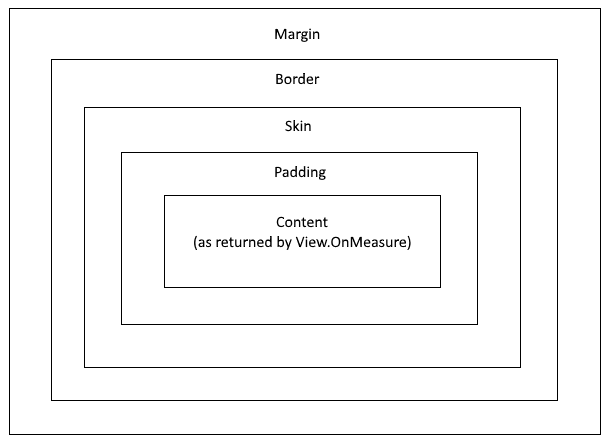
Padding, Border and Margin rects. These behave much like the identically name ‘css’ styling properties in that they provide a nested set of rects that surrounds the view contents. Note that the ‘min’ and ‘max’ values for these rects should typically be negative, eg: to add a 4 pixel padding border to a view, use something like view.Style.Padding=New Recti( -4,-4,4,4 ).
BackgroundColor and BorderColor. Set alpha to 0 to prevent backgound or border from being rendered.
Skin and SkinColor. A style can have an optional ‘9 patch’ skin that is drawn outside of padding but inside the
border and margin areas. If present, a skin actually provides another rect that goes around the padding rect.
Font and TextColor. These are for any text drawn in the view.
IconColor. This is for an any icons drawn in the view.
When a view is measured (see below), the padding, skin, border and margin rects are ‘added’ to the content rect (as returned by OnMeasure) to produce a final ‘bounding’ rect. This is the rect that is used to actually layout a view within its frame.
Attachments:
-
AuthorPosts
You must be logged in to reply to this topic.