About Monkey 2 › Forums › Monkey 2 Programming Help › Need help with blending
This topic contains 9 replies, has 4 voices, and was last updated by ![]() ArtemKuchin 1 year, 7 months ago.
ArtemKuchin 1 year, 7 months ago.
-
AuthorPosts
-
September 16, 2017 at 11:37 am #10527
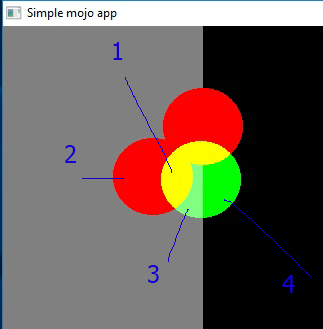
Please take a look at the attached file.
image1 is a red circle
image is green circle
This image was created like this:
Monkey123456789canvas.Clear(Color.Grey)canvas.Color=Color.Blackcanvas.DrawRect(200,0,200,400)canvas.Color=Color.Whitecanvas.BlendMode=BlendMode.Alphacanvas.DrawImage(image1,150,50)canvas.DrawImage(image1,100,100)canvas.BlendMode=BlendMode.Additivecanvas.DrawImage(image2,x,y)The problem for me is area marked 3. I don’t need any blending there.
I need to blend only the image2 over image1 and get the yello as in area 1.
However, in area 3 i need to get pure green same as in area 4.
As i understand i can use some trickery with getting pixmap from canvas, processing it based on RGV values and the putting it back. But that might be too slow. Green circle moves with mouse, need to be very responsive.
I don’t know anything abiut shaders, but maybe they may help?
Attachments:
September 16, 2017 at 1:06 pm #10529I don’t know if this will help you but the only way I can think of is to do it like this:
[/crayon]Monkey123456789101112[crayon-5cba96928aae0561245553 inline="true" ]canvas.Clear(Color.Grey)canvas.Color=Color.Blackcanvas.DrawRect(200,0,200,400)canvas.Color=Color.Whitecanvas.BlendMode=BlendMode.Alphacanvas.DrawImage(image2,x,y) '*************canvas.DrawImage(image1,150,50)canvas.DrawImage(image1,100,100)canvas.BlendMode=BlendMode.Additivecanvas.DrawImage(image2,x,y) '**************September 16, 2017 at 6:19 pm #10537alas, this is not it because if te green circle is for example 0x88 then when blended with itself using additive blending it gets 0xff color in green channel, which is is not the original 0x88
i miss normal bitwise OR/AND/XOR blending
September 16, 2017 at 8:32 pm #10544you can try drawing the circles to an image and test the speed to see if it’s fast enough for you.
something like this:
[/crayon]Monkey1234567891011121314151617181920212223242526272829303132333435363738394041424344454647484950515253545556575859606162636465666768697071[crayon-5cba969291749830827676 inline="true" ]Namespace myapp#Import "<std>"#Import "<mojo>"Using std..Using mojo..Class MyWindow Extends WindowField image1:ImageField image2:ImageField image3:ImageField cnvs:CanvasField img:ImageMethod New( title:String="Simple mojo app",width:Int=640,height:Int=480,flags:WindowFlags=Null )Super.New( title,width,height,flags )image1 = New Image(100,100)cnvs = New Canvas(image1)cnvs.Clear(New Color(0,0,0,0))cnvs.Color= New Color(1,0,0)cnvs.DrawCircle(50,50,50)cnvs.Flush()image2 = New Image(100,100)cnvs = New Canvas(image2)cnvs.Clear(New Color(0,0,0,0))cnvs.Color= New Color(1,0,0)cnvs.DrawCircle(50,50,50)cnvs.Flush()image3 = New Image(100,100)cnvs = New Canvas(image3)cnvs.Clear(New Color(0,0,0,0))cnvs.Color= New Color(0,1,0)cnvs.DrawCircle(50,50,50)cnvs.Flush()img = New Image(640,480)cnvs = New Canvas(img)cnvs.Clear(New Color(0,0,0,0))SwapInterval = 0EndMethod OnRender( canvas:Canvas ) OverrideApp.RequestRender()canvas.Clear(Color.Grey)canvas.Color=Color.Blackcanvas.DrawRect(200,0,200,400)canvas.Color =Color.Whitecnvs.Clear(New Color(0,0,0,0))cnvs.BlendMode=BlendMode.Alphacnvs.DrawImage(image1,150,50)cnvs.DrawImage(image2,100,100)cnvs.BlendMode=BlendMode.Additivecnvs.DrawImage(image3,Mouse.X-50,Mouse.Y-50)cnvs.Flush()canvas.DrawImage(img,0,0)EndEndFunction Main()New AppInstanceNew MyWindowApp.Run()EndSeptember 16, 2017 at 9:23 pm #10546I suspect separating the display into two layers may be possible with rects in background and circles in frontground.
An offscreen render surface initialized with alpha 0 could be composed of the circles and then layered on to main display may be pretty easy hack for mojo2d.
A single overlay may add a fixed overhead to render time but open up a lot of possibilities for interesting compositing effects.
September 17, 2017 at 5:39 pm #10590Thank you Jesse.
I ran your code and it works as needed.I tested perfomance and compared.
Your code run at 90 fps
My code runs at 350 fps
If i put
cnvs=canvas
befor
cnvs.Clear(New Color(0,0,0,0))
(basically drawing again everything into main canvas instead of image)
I get 300 fps from your code
So, drawing into canvas attached to an image has huge perfomance penalty.
Interesting, however, than it does not really matter how much i draw into that image canvas. If i have flush or clear
i get stable 90 fps.
I wonder why so much perfomance penalty and why it is pretty constant and independat of how much is drawing into it.
September 17, 2017 at 11:50 pm #10598If i put
cnvs=canvas
befor
cnvs.Clear(New Color(0,0,0,0))
(basically drawing again everything into main canvas instead of image)
Doesn’t that take you back to the original problem? Might as well not use cnvs.
it doesn’t make sense to me.
September 18, 2017 at 6:03 am #10603Jesse, yes, of course when i make this change i get the original problem.
It was only done to demonstarte the perfomance penalty. And the question why drawing into image convas is so much slower.
September 18, 2017 at 6:54 am #10604You can try creating any images that will be updated on every frame with “TextureFlags.Dynamic”, like :
Monkey1image1 = New Image(100,100, TextureFlags.Dynamic|TextureFlags.FilterMipmap)Etc, to see if the frame rate improves on your hardware.
September 18, 2017 at 7:49 pm #10614Amazing!
Windows 10, intel graphics
before 90 fps
after 220 fps
Android, Samsung J5 2016
before 30 fps
after 120 fps
now this can be actually used

-
AuthorPosts

You must be logged in to reply to this topic.