About Monkey 2 › Forums › Monkey 2 Projects › ted21 find dialog replacement
This topic contains 4 replies, has 2 voices, and was last updated by ![]() AdamStrange
AdamStrange 2 years, 6 months ago.
-
AuthorPosts
-
September 18, 2016 at 10:53 am #4000
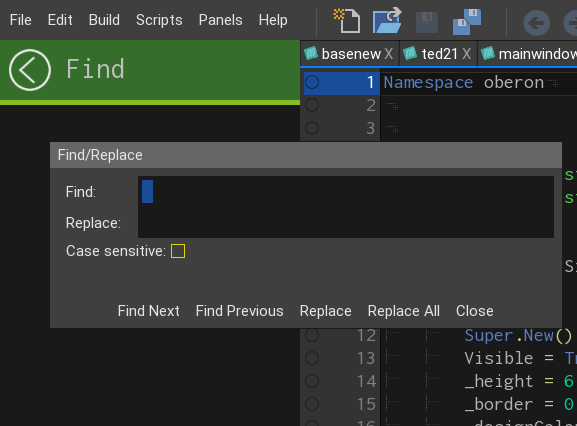
Just started work on the find dialog replacement system for ted21
initial framework ready, just sorting out a few things first. But will have much more streamlined find system with automatic multiple finds shown
Here you can see the old dialog style, with the new integrated version (in green) with it’s new home in the browser panel. It shows and auto hides as needed (already implemented)
It’s taking the new (new document) style which feels much fresher. This style needs to be slightly applied to the help and debug browsers as well so everything matches
Attachments:
September 20, 2016 at 2:24 pm #4041tiny update on this.
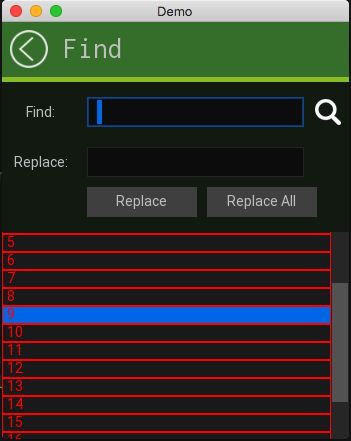
Needed to work on implementing a scroll list system (vertical scrollbar supporting a list)
Here’s is the dev work. All mouse operations are fully functional, need to do keyboard ones next.
You can see the default list and list items in red. The scrollbar hides and resizes as needed.
This is the stand alone version while I work on the list control. then it all gets integrated into ted21
Already got the keyboard tracking and text input fully debugged with cut/copy etc
Attachments:
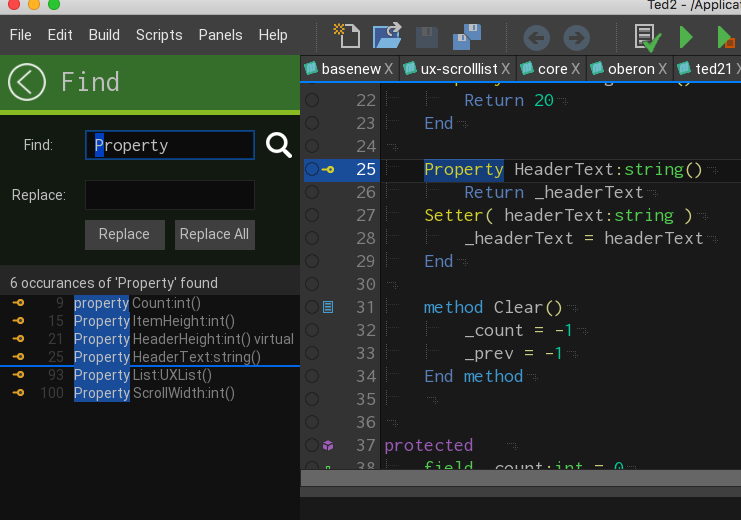
September 21, 2016 at 2:13 pm #4047basic concept is now finished and operational – need further testing and some tweaks before being let loose.
So how does it work and how is it different?
Basically it is similar to other find systems, apart from one main detail. When you find, ALL results are listed!
In the case shown. ‘Property’ was double clicked (selected) and then cmd+f. The dialog appears and automatically begins search for ‘property’ in the current file.
It has found 6 occurrences of ‘property’
These are then listed with the line icon (if one is present for that line), the line number and text highlighting where it was found.
The thin line is sort of where your current cursor is in relation to the find results.
Clicking a find result will take you to that line
Like the code view, this gives you a good feeling for where you are and what the find will give you. it also allows you to decide which (if any) find results you want to jump to…
Attachments:
September 22, 2016 at 2:22 am #4055Looked nice! keep doing
 September 22, 2016 at 7:10 am #4056
Thanks – your fork looks good too!
some weird little things are now being fixed plus some deeper integration stuff like live current line tracking
-
AuthorPosts
You must be logged in to reply to this topic.