About Monkey 2 › Forums › Monkey 2 Programming Help › CRT Shader?
This topic contains 39 replies, has 9 voices, and was last updated by ![]() therevills 1 year, 4 months ago.
therevills 1 year, 4 months ago.
-
AuthorPosts
-
November 19, 2017 at 12:53 am #11812
On the NES MonkeyX1 compo back in 2015, the entry EpicFox had a cool CRT shader effect.
https://pixelpaladin.itch.io/epicfox
PixelPaladin kindly supplied the source code too.
Is there a way to port this MX1 to MX2 to produce a CRT effect? The original code used the class “Material”…
November 19, 2017 at 8:44 am #11814Not the same shader, but I just made a CRT shader while “forcing” myself to learn shaders & mojo…
Still WIP, and does not offer curvature/rounded corners yet, but shouldn’t be that hard to implement.https://github.com/DoctorWhoof/Mojo-Shader-Tests
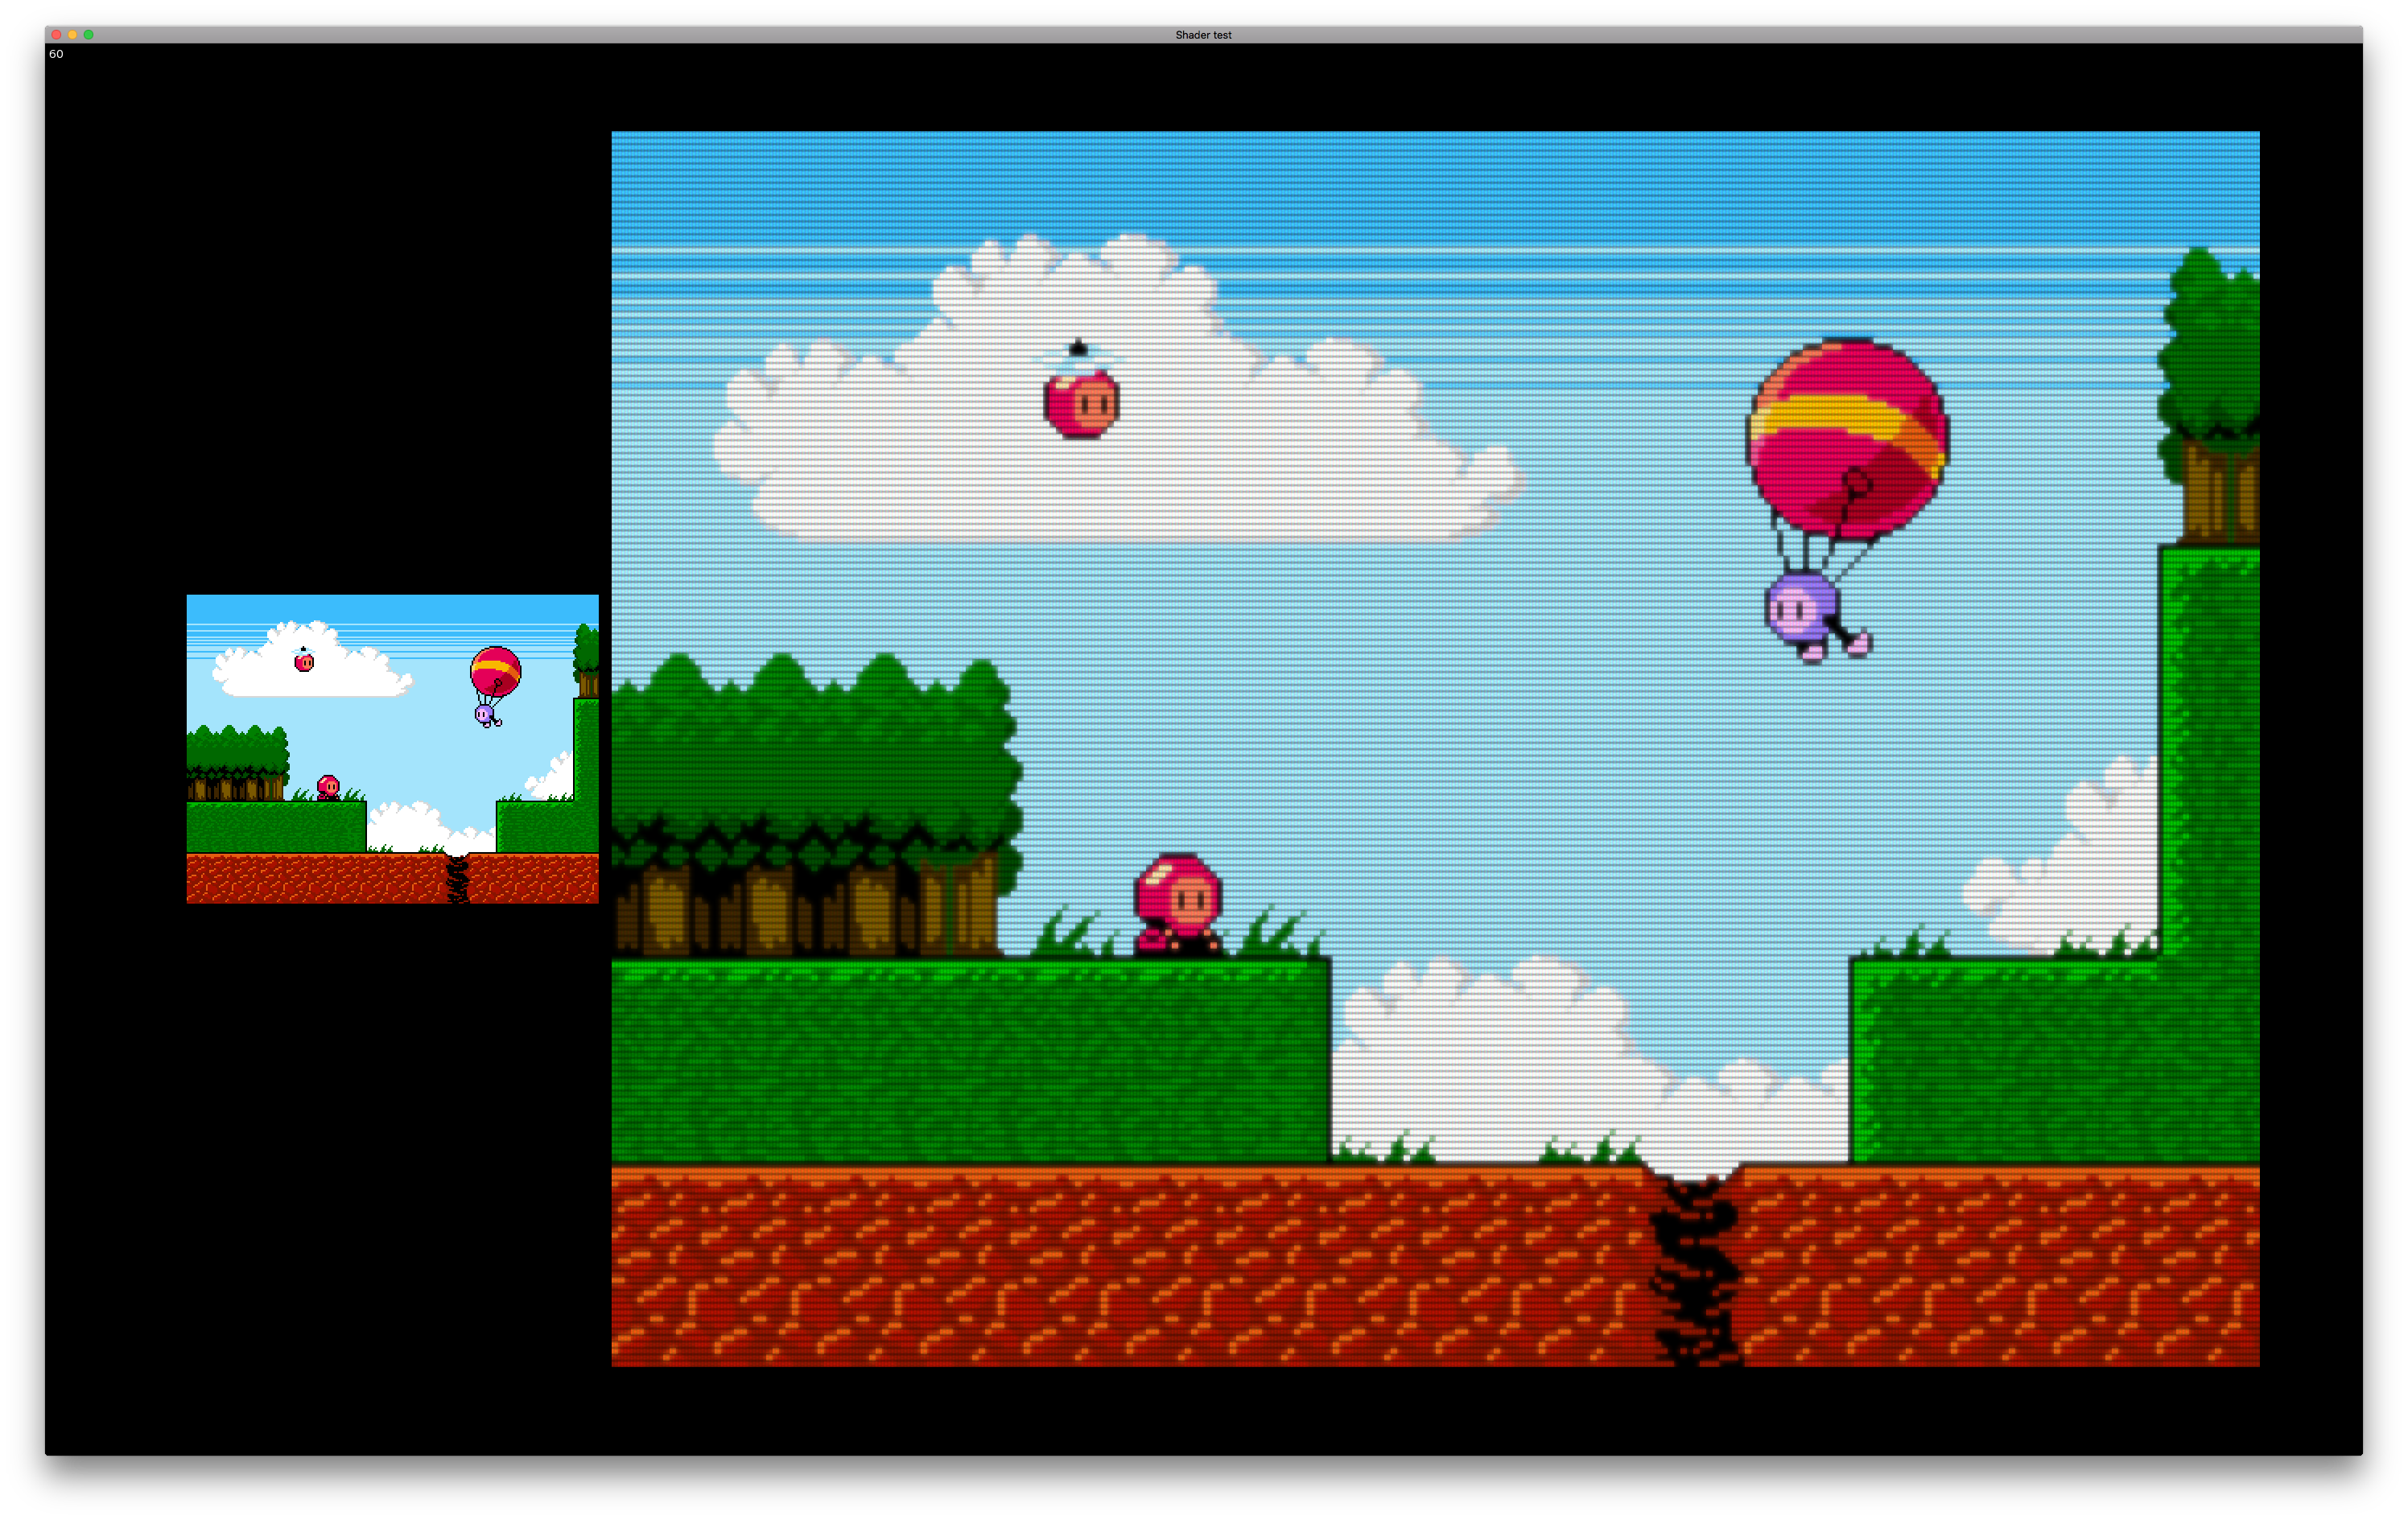
Test 7 is the CRT test.
Have NOT tried this feeding an animated image, though. Have no idea how it will perform…Here’s how it looks in action. Textures are optimized for HiDPI screens like a MacBook Retina monitor. There will be texture scaling in lower resolutions, resulting in a messier shadow mask (the RGB dots on a CRT monitor) pattern.
(right click and “open image in new tab”, then zoom in to see full resolution)
 November 20, 2017 at 7:36 am #11844
Cool! I’ll have a play soon! Thanks!
November 20, 2017 at 8:20 am #11847Hmmm… I’ve got no idea how to use that with real time graphics – lol!
November 20, 2017 at 4:46 pm #11853Yeah, I haven’t tried it yet.
I wonder if there’s a way to “run” the shader on the image.Texture itself, instead of passing a new texture via image.Material.SetTexture like I’m doing here.
Then again, maybe doing it like this is fast enough? You could render to an image canvas, then “feed” that image texture into the shader on every frame, then simply draw that back into the main canvas. Haven’t had time to test it out yet, but my guess is that it’ll be a little slow (I’m aiming for hidpi, so something like 2880×1800 at 60fps would be necessary).
November 20, 2017 at 4:54 pm #11854I’m no expert on this subject, but couldn’t you just make a fullscreen shader?
I have this outline shader that I just apply to the canvas itself November 20, 2017 at 5:00 pm #11855
I know that’s pretty basic, but how do you “feed” the canvas texture into the shader (in other words, how do you access it on the shader side so you can get the RGBA value of each pixel before you manipulate it)?
In my case, I have a
Monkey1uniform sampler2D m_SharpTexture;in the shader that needs to be updated on every frame. Is there a better way?
November 20, 2017 at 5:11 pm #11856Monkey1uniform sampler2D m_ImageTexture0;I can give it a try without changing your code too much…
November 20, 2017 at 5:16 pm #11857Alright, I made a red square just moving about on the screen using the “updated” shader.
It’s real ugly, but as a proof of conceptHere’s the shader using m_ImageTexture0 for ‘blur’ and ‘sharp’ texture:
Monkey12345678910111213141516171819202122232425262728293031323334353637383940414243444546474849505152535455565758//@renderpasses 0,1,2varying vec2 v_TexCoord0;varying vec4 v_Color;//@vertexattribute vec4 a_Position;attribute vec2 a_TexCoord0;attribute vec4 a_Color;uniform mat4 r_ModelViewProjectionMatrix;uniform vec4 m_ImageColor;void main(){v_TexCoord0 = a_TexCoord0;v_Color = m_ImageColor * a_Color;gl_Position=r_ModelViewProjectionMatrix * a_Position;}//@fragmentuniform sampler2D m_ImageTexture0;uniform sampler2D m_Scanlines;uniform sampler2D m_Shadowmask;uniform vec2 m_Resolution;uniform float m_ColorBleed;uniform float m_GlowSize;uniform float m_GlowGain;uniform float m_ScanlineIntensity;uniform float m_ShadowMaskIntensity;void main(){//Scanline texture, mixed with white for fadingvec4 scanColor = mix( vec4(1.0, 1.0, 1.0, 1.0), texture2D( m_Scanlines, v_TexCoord0 * m_Resolution ), m_ScanlineIntensity );vec4 maskColor = mix( vec4(1.0, 1.0, 1.0, 1.0), texture2D( m_Shadowmask, v_TexCoord0 * m_Resolution ), m_ShadowMaskIntensity );//blur offset distancevec2 blurOffset = vec2( m_GlowSize / m_Resolution.x, m_GlowSize / m_Resolution.y );//blur in four directions based on offsetvec2 leftCoord = vec2( v_TexCoord0.x - blurOffset.x, v_TexCoord0.y );vec2 rightCoord = vec2( v_TexCoord0.x + blurOffset.x, v_TexCoord0.y );vec2 topCoord = vec2( v_TexCoord0.x, v_TexCoord0.y + blurOffset.y );vec2 bottomCoord = vec2( v_TexCoord0.x, v_TexCoord0.y - blurOffset.y );//blur colors are mixed for final glow color using BlurTexturevec4 glowX = mix( texture2D( m_ImageTexture0,rightCoord ), texture2D( m_ImageTexture0,leftCoord ), 0.5 );vec4 glowY = mix( texture2D( m_ImageTexture0,topCoord ), texture2D( m_ImageTexture0,bottomCoord ), 0.5 );vec4 glow = mix( glowX, glowY, 0.5 );//final color mixingvec4 color = texture2D( m_ImageTexture0,v_TexCoord0 );vec4 colorWithBleed = mix( max( color, glow ), color, 1.0 - m_ColorBleed );vec4 colorWithGlow = colorWithBleed + ( glow * m_GlowGain );gl_FragColor= ( colorWithGlow * v_Color ) * scanColor * maskColor;}And I massacred your M2 example as well heh:
Monkey12345678910111213141516171819202122232425262728293031323334353637383940414243444546474849505152535455565758596061626364656667686970717273747576#Import "<std>"#Import "<mojo>"#Import "<mojo3d>"#Import "shaders/test07_CRT.glsl"#Import "images/"Using std..Using mojo..'A CRT shader"Class MyWindow Extends WindowField img :ImageField imgClean :ImageField crtCanvas :CanvasField scale :Vec2fField zoom := 8.0Method New()Super.New( "Shader test",1280,720,WindowFlags.Resizable )ClearColor = Color.BlackLocal tex := Texture.Load( "asset::frame.png", TextureFlags.None )Local texBlur := Texture.Load( "asset::frame.png", TextureFlags.FilterMipmap )Local texScan := Texture.Load( "asset::scanline16px.png", TextureFlags.FilterMipmap | TextureFlags.WrapST )Local texMask := Texture.Load( "asset::shadowMask16px.png", TextureFlags.FilterMipmap | TextureFlags.WrapST )Local testShader := New Shader( "test07", LoadString("asset::test07_CRT.glsl"), "" )img = New Image( tex.Width * zoom, tex.Height * zoom,, testShader )'img.Handle = New Vec2f( 0.5 )crtCanvas = New Canvas( img )scale = New Vec2f( img.Width/tex.Width, img.Height/tex.Height )'img.Material.SetTexture( "SharpTexture", tex )'img.Material.SetTexture( "BlurTexture", texBlur )img.Material.SetTexture( "Scanlines", texScan )img.Material.SetTexture( "Shadowmask", texMask )img.Material.SetVec2f( "Resolution", New Vec2f( tex.Width, tex.Height ) )img.Material.SetFloat( "ColorBleed", 1.1 )img.Material.SetFloat( "GlowGain", 0.15 )img.Material.SetFloat( "GlowSize", 0.5 )img.Material.SetFloat( "ScanlineIntensity", 0.25 )img.Material.SetFloat( "ShadowMaskIntensity", 0.25 )imgClean = New Image( tex )imgClean.Handle = New Vec2f( 0.5 )EndMethod OnRender( canvas:Canvas ) OverrideApp.RequestRender()crtCanvas.Clear(Color.Black)crtCanvas.Color=Color.RedcrtCanvas.DrawRect(64+Sin(Millisecs()*0.01)*32, 64+Sin(Millisecs()*0.005)*64,64,64)crtCanvas.Flush()'canvas.DrawImage( imgClean, Width*.15, Height/2, 0, 2, 2 )', 0, scale.X, scale.Y )canvas.DrawImage( img, 0, 0 )canvas.DrawText( App.FPS, 5, 5 )EndEndFunction Main()New AppInstanceNew MyWindowApp.Run()EndNovember 20, 2017 at 5:22 pm #11858Awesome, thanks! This is exactly what I was asking!
Will give it a try when I get home later today.November 20, 2017 at 6:04 pm #11863Awesome, thanks! This is exactly what I was asking!
Will give it a try when I get home later today.and then you’ll come hang out with us on #monkey2 on https://freenode.net/ like you used to!
 November 21, 2017 at 8:39 am #11880
@ethernaut, just downloaded the git master zip and I cant compile examples 4, 7 and 8:
4:
Monkey12345678910111213141516Failed to link program:C:\fakepath(61,12-36): warning X3571: pow(f, e) will not work for negative f, use abs(f) or conditionally handle negative values if you expect themC:\fakepath(42,11-43): error X3507: '_plot': Not all control paths return a valueWarning: D3D shader compilation failed with default flags. (ps_5_0)Retrying with skip validationC:\fakepath(61,12-36): warning X3571: pow(f, e) will not work for negative f, use abs(f) or conditionally handle negative values if you expect themC:\fakepath(42,11-43): error X3507: '_plot': Not all control paths return a valueWarning: D3D shader compilation failed with skip validation flags. (ps_5_0)Retrying with skip optimizationC:\fakepath(42,11-43): error X3507: '_plot': Not all control paths return a valueWarning: D3D shader compilation failed with skip optimization flags. (ps_5_0)Failed to create D3D shaders.7:
Monkey12345Failed to compile fragment shader:ERROR: 0:51: '-' : wrong operand types no operation '-' exists that takes a left-hand operand of type 'const int' and a right operand of type 'uniform highp float' (or there is no acceptable conversion)ERROR: 0:51: 'mix' : no matching overloaded function foundERROR: 0:51: '=' : cannot convert from 'const float' to 'highp 4-component vector of float'8:
Monkey12345678910Parsing...Semanting...C:/Users/therevills/Downloads/tests/testMaterial.monkey2 [240] : Error : Internal declaration 'ShaderDefs' cannot be accessed from here.C:/Users/therevills/Downloads/tests/testMaterial.monkey2 [243] : Error : Identifier 'defs' Not foundC:/Users/therevills/Downloads/tests/testMaterial.monkey2 [245] : Error : Identifier 'defs' Not foundC:/Users/therevills/Downloads/tests/testMaterial.monkey2 [248] : Error : Identifier 'defs' Not foundC:/Users/therevills/Downloads/tests/testMaterial.monkey2 [253] : Error : Identifier 'defs' Not foundThis is using v1.1.08…
November 21, 2017 at 8:43 am #11881November 21, 2017 at 8:56 am #11882Try the latest one. Just made some modifications with today’s M2 dev branch. Example 08 never worked, I just replaced it with an improved CRT “beam renderer” test. Now the scanline ends are more rounded, and the color blur looks better. Beam rendering still needs some tweaks before I add curvature.
There’s something wrong with 4 – it compiles fine, but the shader has a weird red noise. Will look into it tomorrow.
@hezkore – and I cant compile your example either
That one is probably just the shader file name wrong somewhere, since those tags seem correct.
That said, you seem to be in Windows, and I’m too lazy to boot in Windows to test it! November 21, 2017 at 9:13 am #11883
Yep they both work (MojoShaders_07_CRT and MojoShaders_08_BeamCRT) although had to resize them
 Still running at 1920×1080
 Now we need it in real time
-
AuthorPosts


You must be logged in to reply to this topic.