About Monkey 2 › Forums › Monkey 2 Programming Help › CRT Shader?
This topic contains 39 replies, has 9 voices, and was last updated by ![]() therevills 1 year, 4 months ago.
therevills 1 year, 4 months ago.
-
AuthorPosts
-
November 21, 2017 at 3:46 pm #11887
Now we need it in real time

My example above is real-time
You must have copied the shader incorrectly, cause it’s the exact same shader as nr 7. which you got an error on (that error is btw fixed by writing ‘1.0 -‘ instead of just ‘1 -‘, fixed in my version), but mine has two name changes.
Make sure you get the first line copied which defines the renderpasses.And as I said, all you have to do is replace the ‘sharp’ and ‘blur’ texture with ‘m_ImageTexture0’ and pass the image to a canvas (so that the canvas draws to the image), then there’s no need to pass a texture to the shader, M2 does that for you.
So if you really can’t get my example working, do ^ those things.
November 22, 2017 at 8:20 am #11913Strange when I copy and paste the shaders from here I get the “Can’t find ‘//@renderpasses’ tag” error…
I now get:
Monkey123Invalid uniform type 0 expecting 1Edit:
Got it to work now… no idea what was going on…November 24, 2017 at 12:24 am #11934If there is interest I could write a crt shader module for monkeyX2.
November 24, 2017 at 12:39 am #11935therevills, I had a similar error before
> Invalid uniform type 0 expecting 1
In my case I didn’t set the uniform from outside the shader. I thought I did but that piece of code never got executed and so the shader couldn’t find it.
November 24, 2017 at 8:02 am #11940@pixelpaladin – that would be great!
@anatol – I really dont have any idea what I’m doing with shaders at the moment, never played with them in the past
November 25, 2017 at 3:04 am #11954Okay, I wrote a small crt module.
Get it here:
https://www.dropbox.com/s/pvv6l8hqwsth2vm/crt.zip?dl=0Some example code:
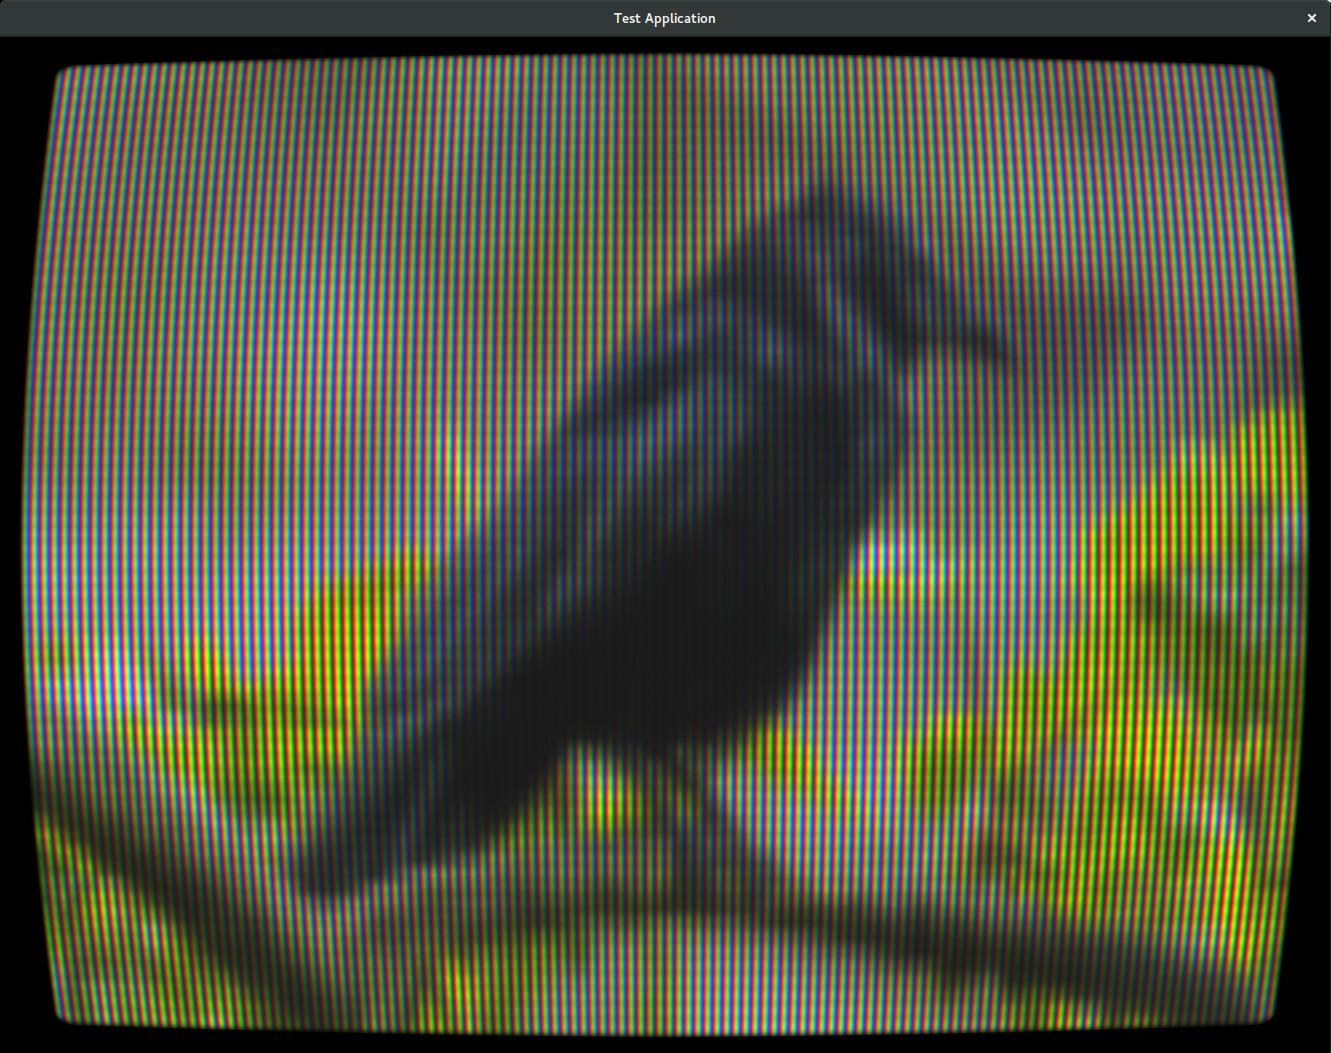
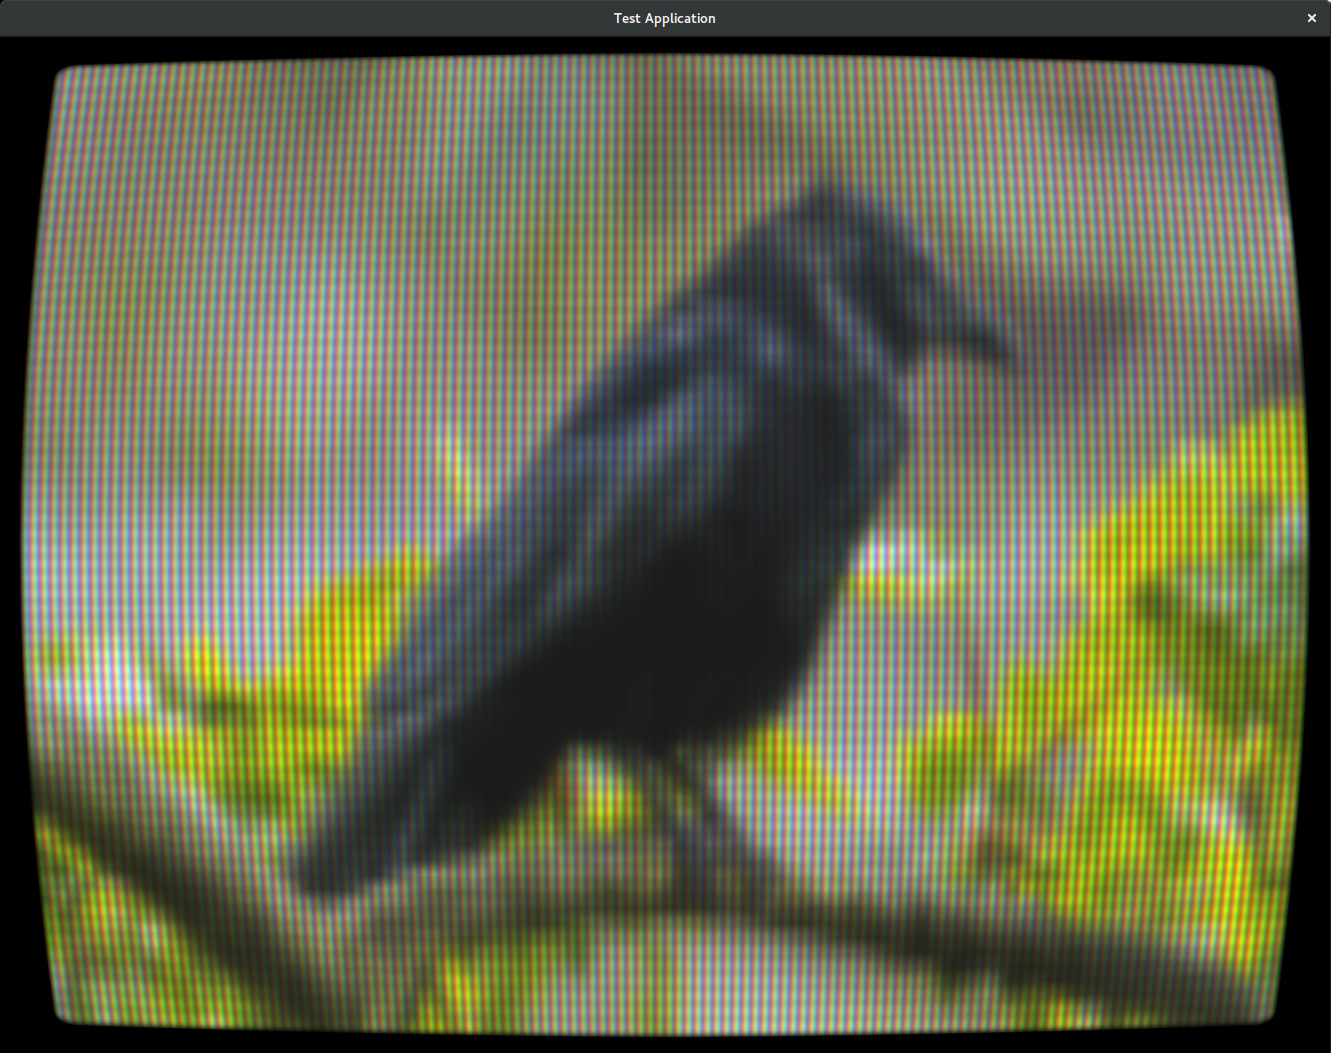
Monkey12345678910111213141516171819202122232425262728293031323334353637383940414243444546474849505152535455565758Namespace application#Import "<std>"#Import "<mojo>"#Import "<crt>"#import "assets/"Using std..Using mojo..Using crt..Class AppWindow Extends WindowField crt:GraphicsCRTField testImage:ImageMethod New(title:String, width:Int, height:Int)'Call super class constructor - this just passes the arguments 'up' to the Window class constructor.Super.New(title, width, height, WindowFlags.Resizable)' initialize crt screen (width, heightn, rgb-split-intensity)crt = New GraphicsCRT(320, 240, 0.75)Layout = "resize"ClearColor = New Color(0.0, 0.2, 0.4)Style.BackgroundColor = Color.BlackSwapInterval = 1EndMethod OnRender(canvas:Canvas) OverrideIf Keyboard.KeyReleased(Key.Escape) Then App.Terminate()App.RequestRender()' get crt canvas:Local crtCanvas:Canvas = crt.Canvas' render some stuff on crt screen:crtCanvas.Clear(Color.Black)crtCanvas.BlendMode = BlendMode.AlphacrtCanvas.Color = Color.WhitecrtCanvas.DrawText("Move Mouse", 5, 5)crtCanvas.BlendMode = BlendMode.AdditivecrtCanvas.Color = New Color(Float(Mouse.X)/Width, Float(Mouse.Y)/Height, 0.0)crtCanvas.DrawCircle(Float(Width-Mouse.X)*Float(crt.Resolution.x)/Width, Float(Height-Mouse.Y)*Float(crt.Resolution.y)/Height, 50)crtCanvas.Color = New Color(1.0-Float(Mouse.X)/Width, 1.0-Float(Mouse.Y)/Height, 1.0)crtCanvas.DrawCircle(Mouse.X*crt.Resolution.x/Width, Mouse.Y*crt.Resolution.y/Height, 50)' draw crt screen on canvas:crt.DrawScreen(canvas, 0, 0, Width, Height)EndEndFunction Main()New AppInstanceNew AppWindow("Test Application", App.DesktopSize.x/2 ,App.DesktopSize.y/2)App.Run()End(only resolutions between 128×64 and 800×600 are allowed)
November 25, 2017 at 8:51 am #11966Thanks for sharing!

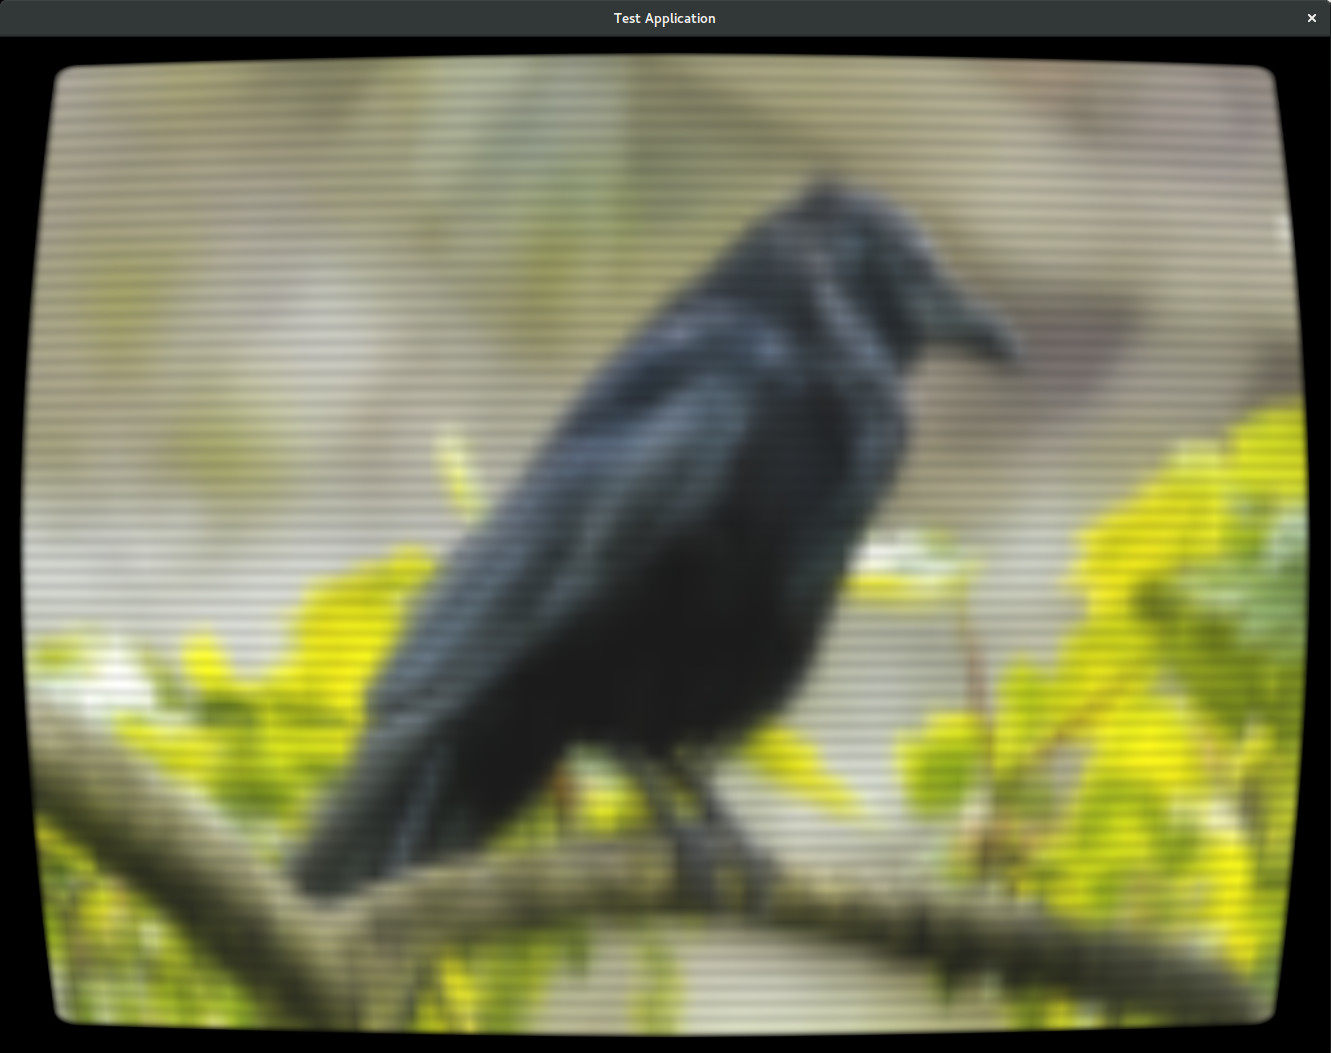
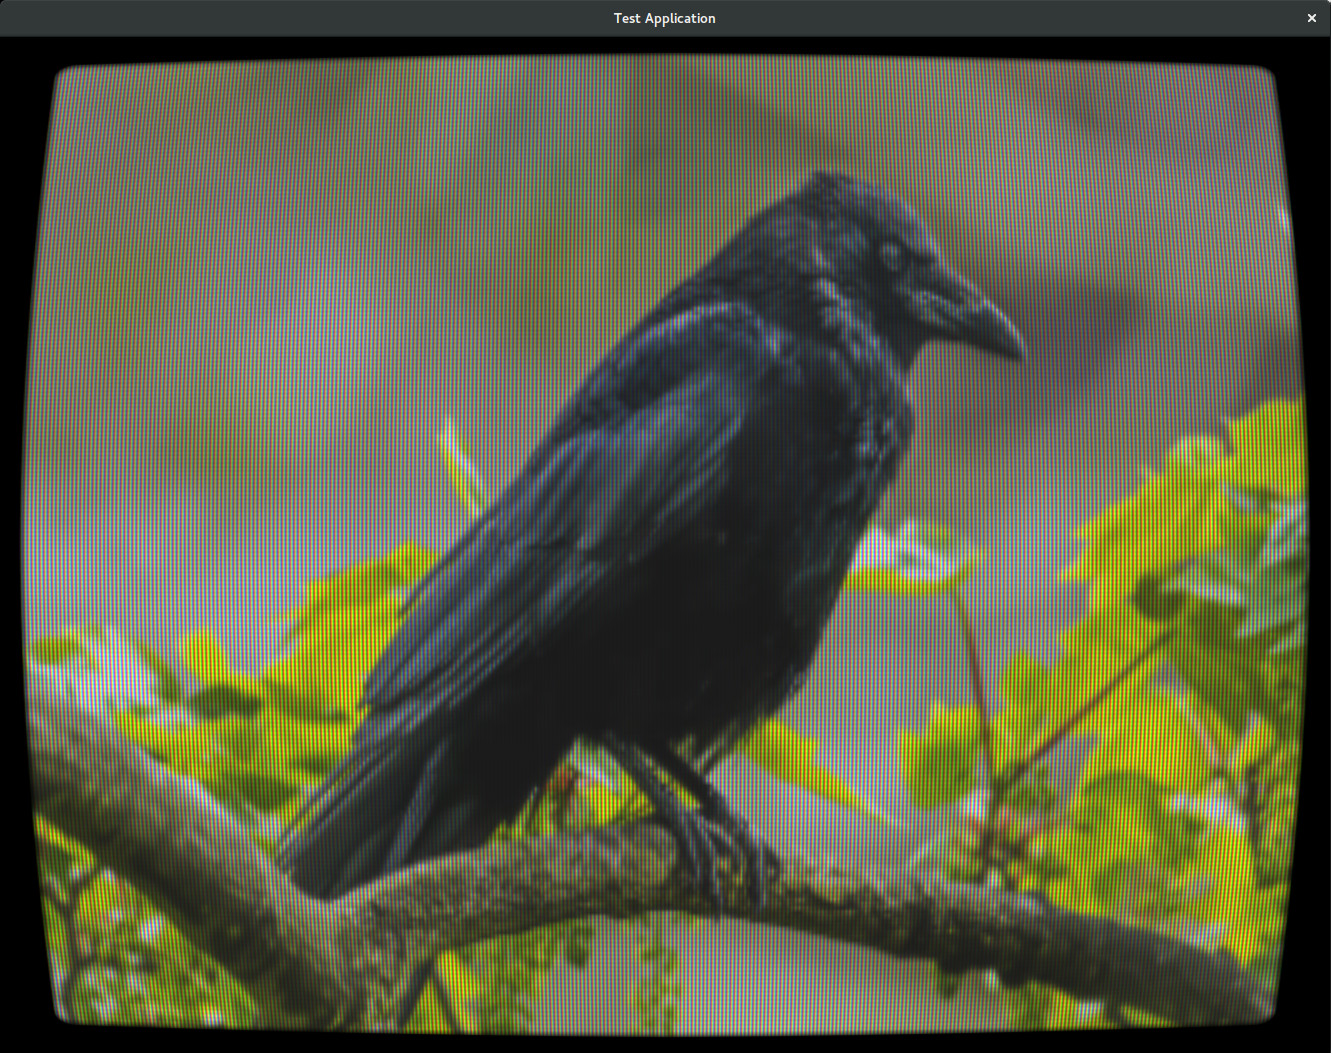
I also updated my shader tests repository with my latest CRT shader. Still needs some tweaks, but it’s very customizable, and is already working pretty well for an “arcade monitor” style image. It has features like variable width scanlines, soft glow, color correction and image filtering on a single axis.

There’s also a “useful functions” .glsl file in the shaders folder, with functions I found while googling around, with credits for each one.
https://github.com/DoctorWhoof/Mojo-Shader-Tests
Cheers.
November 25, 2017 at 4:55 pm #11974@ethernaut: That looks nice! I like the glow effect. How did you implement it?
I changed some parameters. The image is now less distorted (but in the corners some pixels are not visible anymore). It is now also possible to set the intensity for rgb splitting (the vertical lines) as well as the intensity of the scan lines (the horizontal lines):
Monkey1New GraphicsCRT(width:UInt, height:UInt, rgbSplitIntensity:Float=0.5, scanlineIntensity:Float=0.1))Attachments:
November 25, 2017 at 6:43 pm #11977The glow was a pain, took me something like 2 or 3 nights fiddling with the code and the parameters to get it to look right. This is what I got in the end:
C1234567891011121314151617181920vec3 glow( sampler2D image, vec2 uv, float glowRadius, vec2 res ){vec3 result = vec3( 0.0, 0.0, 0.0 );vec2 pixSize = vec2( 1.0/m_Resolution.x, 1.0/m_Resolution.y );float glowRadiusUV = glowRadius * pixSize.x;int samples = int(glowRadius)*2;int halfsamples = samples/2;for( int x=-halfsamples; x<=halfsamples; x++ ){for( int y=-halfsamples; y<=halfsamples; y++ ){float posX = float(x)/float(halfsamples);float posY = float(y)/float(halfsamples);float xoffset = posX*glowRadius*pixSize.x;float yoffset = posY*glowRadius*pixSize.y;float fade = 1.0 - (abs(posX)*abs(posY));result += ( texture2D( image, vec2( uv.x + xoffset, uv.y + yoffset ) ).rgb * fade );}}return result;}The number of X and Y samples increases automatically when the glow size is larger, so it gets very expensive very quick. 2.0 seems like a good amount for an Ok looking glow with a reasonable performance (runs on a 2880×1800 image at 60fps on a laptop with intel graphics).
But the trick that actually helped a lot was to “pre-mix” the glow with the main color using “max( color, glowColor * 1.5 )” before doing the additive mix. This “fills” the dark spaces between pixels more, and makes the glow more visible without making the image much brighter. Have a look at the full glsl code here:
https://github.com/DoctorWhoof/Mojo-Shader-Tests/blob/master/shaders/test07_CRT.glsl
It’s kinda messy, I don’t really know what I”m doing!
Cheers!November 25, 2017 at 11:48 pm #11979@pixelpaladin – I cant get your code to work. When I try to compile I get:
Monkey12Error : Can't find overload for 'new:Void(monkey.types.String,monkey.types.String,monkey.types.String)' with argument types (monkey.types.String,monkey.types.String)So I changed this line:
Monkey1crtShader = New Shader("crtshader", CRT_ShaderCode)to
Monkey1crtShader = New Shader("crtshader", CRT_ShaderCode, "")So it now compiles but crashes at runtime:
Monkey1Attempt to invoke method on null instanceFull code:
Monkey123456789101112131415161718192021222324252627282930313233343536373839404142434445464748495051525354555657585960616263646566676869707172737475767778798081828384858687888990919293949596979899100101102103104105106107108109110111112113114115116117118119120121Namespace crt#Import "<std>"#Import "<mojo>"#import "assets/tvscreen.png"Using std..Using mojo..Class GraphicsCRTField crtCanvas:CanvasField crtImage:ImageField crtShader:ShaderField resolution:Vec2iGlobal Instance:GraphicsCRT = NullField overlayImg:ImageMethod New(width:UInt = 320, height:UInt = 240, rgbSplitIntensity:Float = 0.5, scanlineIntensity:Float = 0.1)If Instance <> Null Then RuntimeError("only one crt graphics instance is allowed")Instance = SelfIf width < 128 Then width = 128If width > 800 Then width = 800If height < 64 Then height = 64If height > 600 Then height = 600If rgbSplitIntensity < 0.0 Then rgbSplitIntensity = 0.0If rgbSplitIntensity > 1.0 Then rgbSplitIntensity = 1.0resolution = New Vec2i(width, height)Local CRT_ShaderCode:String'CRT_ShaderCode = LoadString("asset::crt.txt")CRT_ShaderCode = "~n//@renderpasses 0,1,2~n~nvarying vec2 texCoord0;~nvarying vec4 color;~n~n//@vertex~n~nattribute vec4 mx2_Vertex;~nattribute vec2 mx2_TexCoord0;~nattribute vec4 mx2_Color;~n~nuniform mat4 mx2_ModelViewProjectionMatrix;~n~nuniform vec4 mx2_ImageColor;~n~nvoid main(){~n~n~ttexCoord0=mx2_TexCoord0;~n~n~tcolor=mx2_ImageColor * mx2_Color;~n~t~n~tgl_Position=mx2_ModelViewProjectionMatrix * mx2_Vertex;~n}~n~n//@fragment~n~nuniform sampler2D mx2_ImageTexture0;~n~nvoid main(){~n~n#if MX2_RENDERPASS==0~n~tvec2 texcoords = texCoord0;~n~tfloat bl = %BORDER_LEVEL%*0.1;~n~tfloat x = texcoords.x*(1.0+bl)-bl/2.0;~n~tfloat y = texcoords.y*(1.0+bl)-bl/2.0;~n~tfloat x2 = (x-0.5)*(1.0+ 0.5*%EFFECT_LEVEL% *((y-0.5)*(y-0.5)))+0.5;~n~tfloat y2 = (y-0.5)*(1.0+ 0.25*%EFFECT_LEVEL% *((x-0.5)*(x-0.5)))+0.5;~n~tvec2 v2 = vec2(x2, y2);~n~tvec4 temp = texture2D(mx2_ImageTexture0, v2);~n~tif (v2.x<0.0 || v2.x>1.0 || v2.y<0.0 || v2.y>1.0) {~n~t~ttemp = vec4(0.0,0.0,0.0,1.0);~n~t}else{~n~t~tfloat cr = sin((x2*%WIDTH%) *2.0*3.1415) * 0.5+0.5+0.1; //if(cr < 0.0) cr = 0.0;~n~t~tfloat cg = sin((x2*%WIDTH%-1.0*2.0*3.1415)*2.0*3.1415) * 0.5+0.5+0.1; //if(cg < 0.0) cg = 0.0;~n~t~tfloat cb = sin((x2*%WIDTH%-2.0*2.0*3.1415)*2.0*3.1415) * 0.5+0.5+0.1; //if(cg < 0.0) cg = 0.0;~n~t~ttemp = mix(temp*vec4(cr,cg,cb,1.0),temp,1.0-%RGB_SPLIT_INTENSITY%);~n~t~tif (%HEIGHT% <= 320.0) {~n~t~t~tfloat ck = sin((y2*%HEIGHT%) *2.0*3.1415) * 0.5+0.5+0.1;~n~t~t~ttemp = temp*(1.0-%SCANLINE_INTENSITY%) + temp*ck*%SCANLINE_INTENSITY%;~n~t~t}~n~t}~n~tgl_FragColor = (temp * color)*0.875+0.125;~n#else~n~tfloat alpha=texture2D( mx2_ImageTexture0,texCoord0 ).a * color.a;~n~tgl_FragColor=vec4( 0.0,0.0,0.0,alpha );~n#endif~n}~n"CRT_ShaderCode = CRT_ShaderCode.Replace("%WIDTH%", String(Int(resolution.x)+".0"))CRT_ShaderCode = CRT_ShaderCode.Replace("%HEIGHT%", String(Int(resolution.y)+".0"))CRT_ShaderCode = CRT_ShaderCode.Replace("%EFFECT_LEVEL%", "0.3")'0.5CRT_ShaderCode = CRT_ShaderCode.Replace("%BORDER_LEVEL%", "0.3")Local sint:String = scanlineIntensityIf Not sint.Contains(".") Then sint += ".0"CRT_ShaderCode = CRT_ShaderCode.Replace("%SCANLINE_INTENSITY%", sint)Local si:String = rgbSplitIntensityIf Not si.Contains(".") Then si += ".0"CRT_ShaderCode = CRT_ShaderCode.Replace("%RGB_SPLIT_INTENSITY%", si)crtShader = New Shader("crtshader", CRT_ShaderCode, "")crtImage = New Image(resolution.x, resolution.y, TextureFlags.Dynamic, crtShader)crtCanvas = New Canvas(crtImage)overlayImg = Image.Load("asset::tvscreen.png")EndProperty Canvas:Canvas()Return crtCanvasEndProperty Resolution:Vec2i()Return resolutionEndMethod DrawScreen:Void(targetCanvas:Canvas, x:Float, y:Float, width:Float, height:Float)crtCanvas.Flush()If targetCanvas = Null Then ReturntargetCanvas.DrawRect(x, y, width, height, crtImage)Local tempColor := targetCanvas.ColortargetCanvas.Color = Color.WhitetargetCanvas.DrawRect(x, y, width, height, overlayImg)targetCanvas.Color = tempColorEndEndClass AppWindow Extends WindowField crt:GraphicsCRTField testImage:ImageMethod New(title:String, width:Int, height:Int)'Call super class constructor - this just passes the arguments 'up' to the Window class constructor.Super.New(title, width, height, WindowFlags.Resizable)' initialize crt screen (width, heightn, rgb-split-intensity)crt = New GraphicsCRT(320, 240, 0.75)Layout = "resize"ClearColor = New Color(0.0, 0.2, 0.4)Style.BackgroundColor = Color.BlackSwapInterval = 1EndMethod OnRender(canvas:Canvas) OverrideIf Keyboard.KeyReleased(Key.Escape) Then App.Terminate()App.RequestRender()' get crt canvas:Local crtCanvas:Canvas = crt.Canvas' render some stuff on crt screen:crtCanvas.Clear(Color.Black)crtCanvas.BlendMode = BlendMode.AlphacrtCanvas.Color = Color.WhitecrtCanvas.DrawText("Move Mouse", 5, 5)crtCanvas.BlendMode = BlendMode.AdditivecrtCanvas.Color = New Color(Float(Mouse.X)/Width, Float(Mouse.Y)/Height, 0.0)crtCanvas.DrawCircle(Float(Width-Mouse.X)*Float(crt.Resolution.x)/Width, Float(Height-Mouse.Y)*Float(crt.Resolution.y)/Height, 50)crtCanvas.Color = New Color(1.0-Float(Mouse.X)/Width, 1.0-Float(Mouse.Y)/Height, 1.0)crtCanvas.DrawCircle(Mouse.X*crt.Resolution.x/Width, Mouse.Y*crt.Resolution.y/Height, 50)' draw crt screen on canvas:crt.DrawScreen(canvas, 0, 0, Width, Height)EndEndFunction Main()New AppInstanceNew AppWindow("Test Application", App.DesktopSize.x/2 ,App.DesktopSize.y/2)App.Run()EndNovember 26, 2017 at 12:03 am #11980So you used a single-pass approach. Multi-pass would be faster, but if you get 60 fps on Intel graphics it should be absolutely okay (I wanted to implement it but I was too lazy
)Somehow my biggest problem with monkey2’s mojo is that I cannot pass values to shaders. I really don’t like that. The only possibility to pass values to a shader seems to be encoding them into a hidden area of the source image … which seems odd to me.
November 26, 2017 at 12:13 am #11981@pixelpaladin – did you see my post just before yours?
November 26, 2017 at 4:14 am #11984I’m actually getting the same errors as @therevills on MacOS. Maybe it’s because I’m using the latest dev branch?
So you used a single-pass approach. Multi-pass would be faster
Baby steps! Until a couple weeks ago I wouldn’t even know where to start if someone asked me how a shader works… :-)… Multi-pass here would actually be ideal, since the glow should happen on the image after the scanlines and shadow mask are applied. Any pointers on how exactly I’d make it happen? For instance, where do you store each pass resulting texture, and how do you use it on the next pass? Is it just updated on the m_ImageTexture0 itself?
Somehow my biggest problem with monkey2’s mojo is that I cannot pass values to shaders
I didn’t get that part. Can’t you pass values using methods like Image.Material.SetFloat?
Cheers.
November 26, 2017 at 1:43 pm #11988Any pointers on how exactly I’d make it happen?
The idea behind the multi pass approach is to blur in one direction first (let’s say in x direction) and in the next pass blur in the other direction (y). This reduces running time from O(n²) to O(n). In mojo you could render into different images using multiple canvases (I am not sure how efficient this is – maybe there is a better solution to this). To get a soft blur a gauss kernel is often used. It can be statically included into the shader as an array or it can be passed to the shader as a texture. However I cannot figure out how pass stuff to the shader in monkey2’s mojo (everything I tried just crashed my program).
I didn’t get that part. Can’t you pass values using methods like Image.Material.SetFloat?
That was what I thought – but I have no idea how to do this. Is there any documentation or a tutorial to this? Let’s say I have a uniform float foo in my shader. What do I need to do to set the value of foo in my monkey source?
Edit: I figured out, how it works … fixing everything right now.
November 26, 2017 at 2:39 pm #11990@therevills: no, sorry. I updated my monkey2 to the newest version and now my code crashes, too. I will try to fix that. Seems like the shader stuff has changed a lot in the last months …
-
AuthorPosts


You must be logged in to reply to this topic.