Forum Replies Created
-
AuthorPosts
-
^Awesome. Glad it runs good. What video card do you have?
The Alien Phoenix framework will be available to all under the same license as Monkey. I am getting ready to release a game demo very soon and this little test helps to make sure that will go smoothly.
Video for those curious.
Just uploaded this demo!

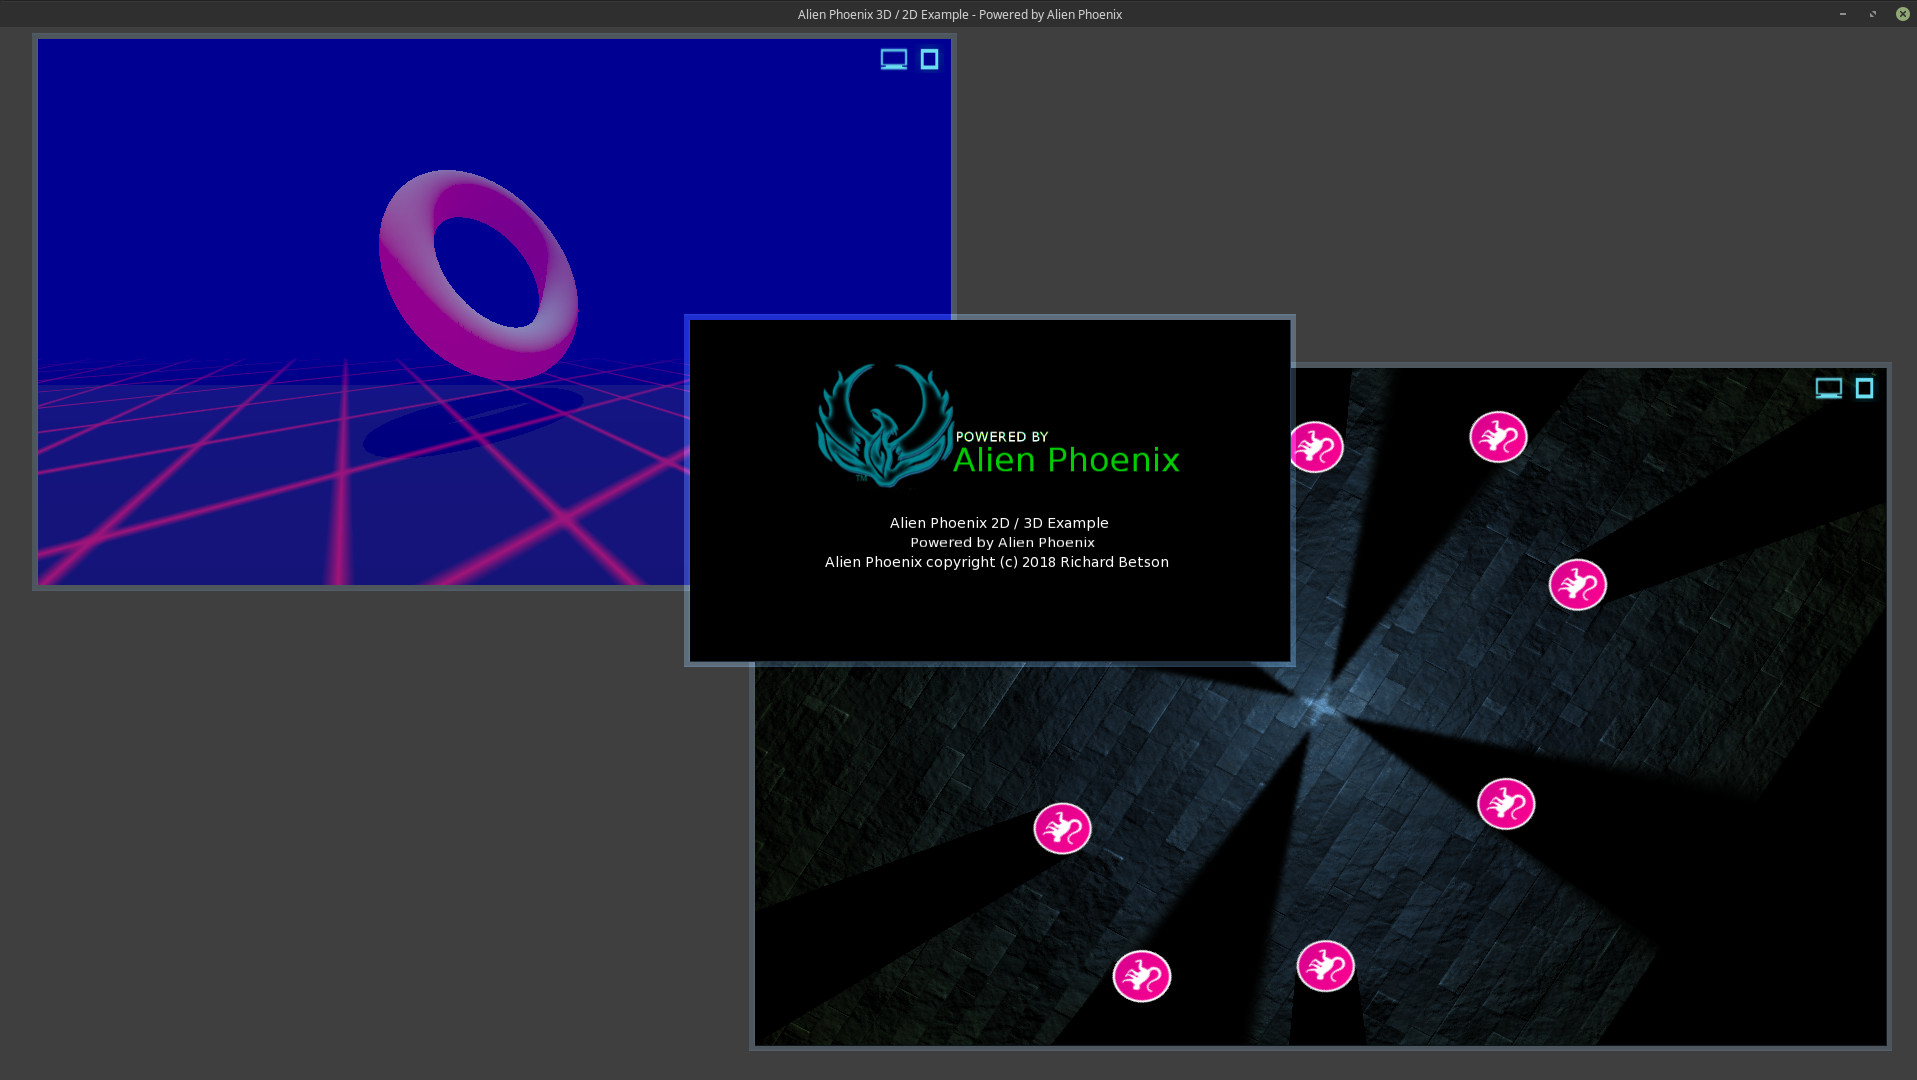
Alien Phoenix 2D / 3D example (WASM).Hi, I have posted a web assembly demo compiled with Emscipten. Featuring Mark’s simple light demo (with canvas scale, rotation) and a 3D demo all running real-time in my window based GUI. If you have ever wondered what Alien Phoenix can do this demo will give you a good look.
You may have to wait for all data to be downloaded before it will run. The download data counter will hit it’s max before everything is downloaded, especially on slower connections. If you have any issues try reloading. Left-click and hold in a window to move it. Windows resize.
Rock on.
Attachments:
Alien Phoenix will be available to all under the same license as Monkey. Coming Soon!Try this demo!
Alien Phoenix 2D / 3D example (WASM).Hi, I have posted a web assembly demo compiled with Emscipten. Featuring Mark’s simple light demo (with canvas scale, rotation) and a 3D demo all running real-time in my window based GUI. If you have ever wondered what Alien Phoenix can do this demo will give you a good look.
You may have to wait for all data to be downloaded before it will run. The download data counter will hit it’s max before everything is downloaded, especially on slower connections. If you have any issues try reloading. Left-click and hold in a window to move it. Windows resize.
I have posted the source code for this demo below (plus screen shot) for those curious.
Rock on.
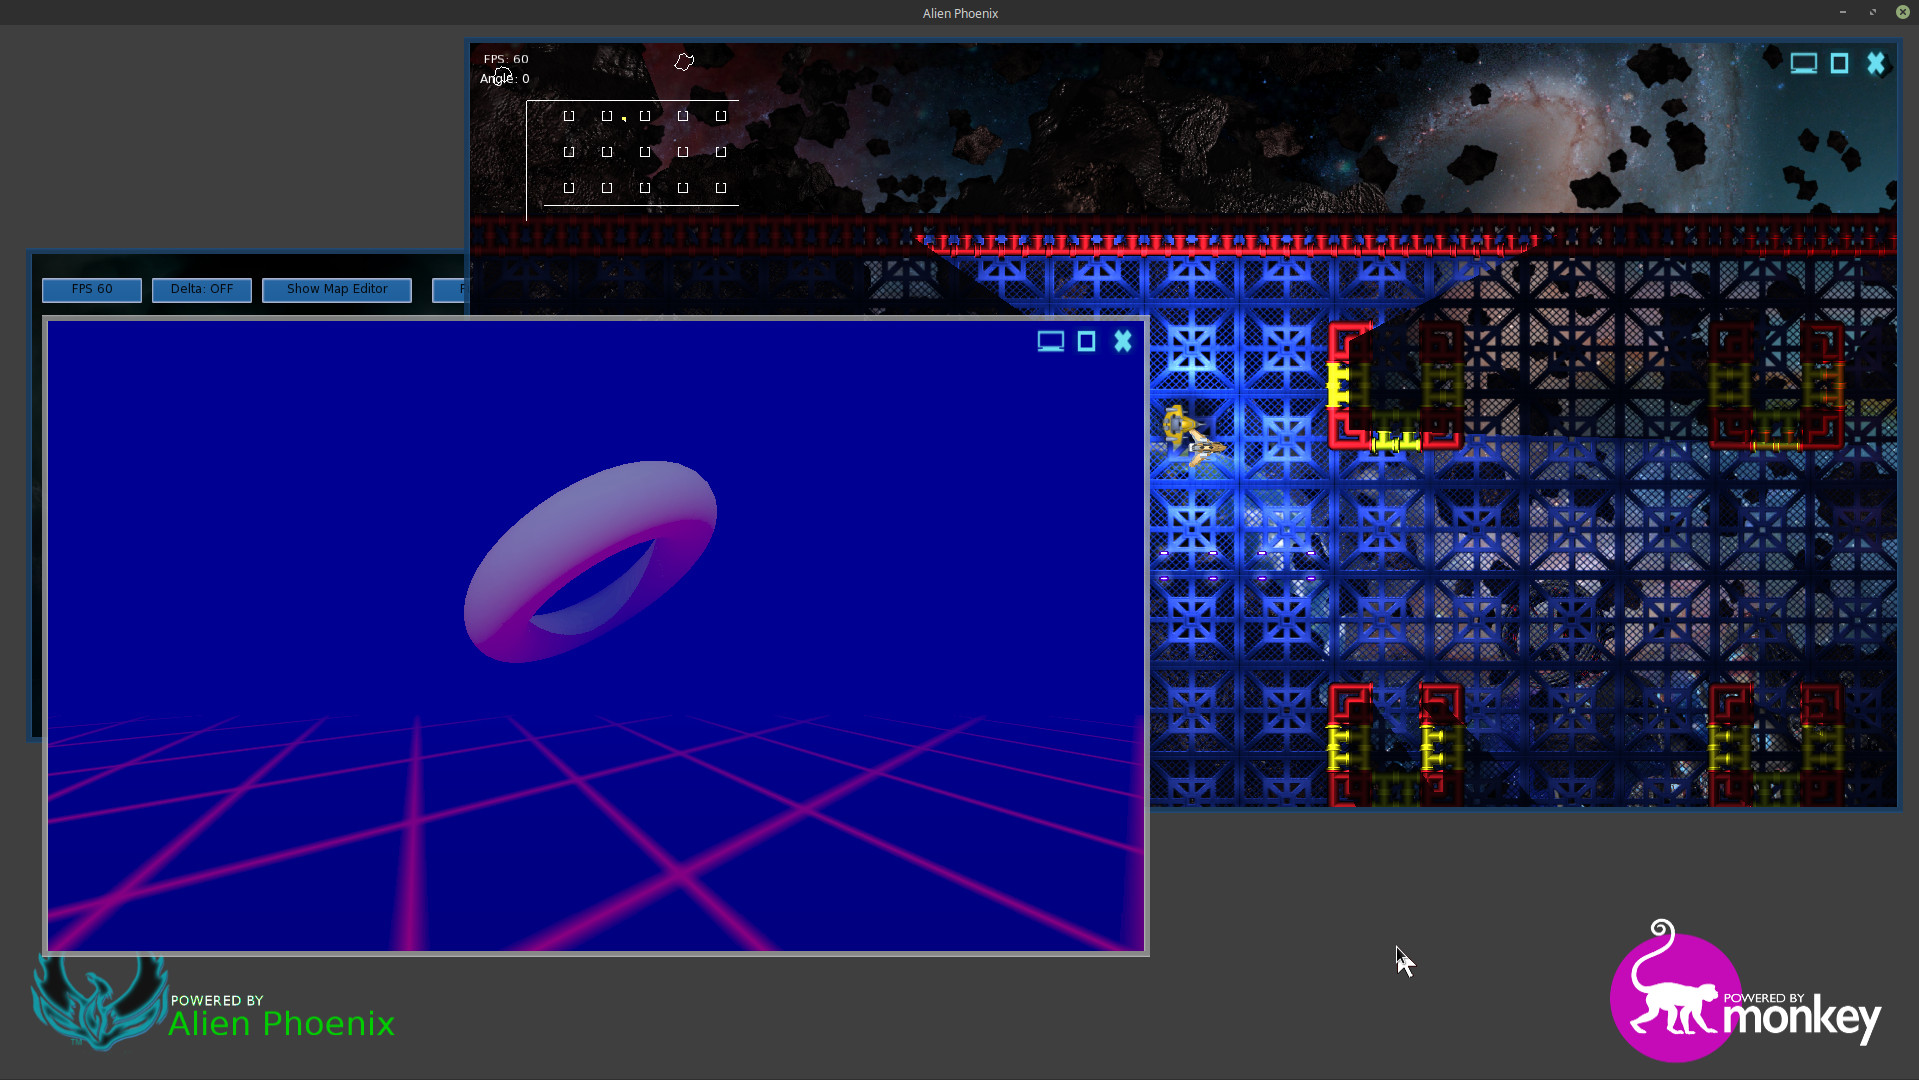
Monkey123456789101112131415161718192021222324252627282930313233343536373839404142434445464748495051525354555657585960616263646566676869707172737475767778798081828384858687888990919293949596979899100101102103104105106107108109110111112113114115116117118119120121122123124125126127128129130131132133134135136137138139140141142143144145146147148149150151152153154155156157158159160161162163164165166167168169170171172173174175176177178179180181182183184185186187188189190191192193194195196197198199200201202203204205206207208209210211212213214215216217218219220221222223224225226227228229230231232233234235236237238239240241242243244245246247248249250251252253254255256257258259260261262263264265266267268269270271272273274275276277278279280281282283284285286287288289290291292293294295296297298299300301'-------------------------------------------------------------------------'Title: Alien Phoenix 2D / 3D example'Author: Richard R Betson'-------------------------------------------------------------------------Namespace phoenixusc#Import "demo_assets/"#Import "<sdl2>"#Import "<std>"#Import "<mojo>"#Import "<mojo3d>"#Import "phoenixbutton"#Import "phoenixwindow"Using std..Using mojo..Using mojo3d..Using sdl2..Using phoenixbuttonUsing phoenixwindowClass PPhoenixWeb Extends WindowField virtualRes:=New Vec2i( 1920, 1080 )Field current_window:=New PWindowField generic_window:=New PWindowField my3d_window:=New PWindowField my2d_window:=New PWindowField about_window:=New PWindowField generic_button:PButtonField install:Bool 'Flag intitail setup'3D window - 3D setupField _scene:SceneField _camera:CameraField _light:LightField _ground:ModelField _donut:ModelField _bloom:BloomEffectField _fog:FogEffect'Simple lightField _floor:ImageField _2d_light:ImageField _logo:ImageField ap_logo:ImageMethod New( title:String,width:Int,height:Int,flags:WindowFlags=WindowFlags.Resizable )Super.New( title, width, height, flags)Layout="Fill"ClearColor=Color.DarkGreyStyle.BackgroundColor=Color.DarkGreySelf.ap_logo=Image.Load( "asset::logo_ap.png" )Self.ap_logo.Scale=New Vec2f( 1,1)Init3D()Init2D()End MethodMethod Init3D()SetConfig( "MOJO_TEXTURE_MAX_ANISOTROPY",16 )Self._scene=Scene.GetCurrent()Self._scene.EnvColor=Color.BlackSelf._scene.ClearColor=Color.BlackSelf._scene.AmbientLight=Color.BlackSelf._camera=New CameraSelf._camera.Near=1Self._camera.Far=1000Self._camera.Move( 0,2,0 )Self._light=New LightSelf._light.RotateX( 100 )Self._light.Range=20Self._light.Move(0,10,0)Self._light.CastsShadow=True'Local pixmap:=New Pixmap( 16,16 )pixmap.Clear( Color.Black )For Local i:=0 Until 16pixmap.SetPixelARGB( i,0,~0 )pixmap.SetPixelARGB( 0,i,~0 )NextLocal texture:=New Texture( pixmap,TextureFlags.FilterMipmap|TextureFlags.WrapST )Local material:=New PbrMaterial( Color.Black )material.EmissiveTexture=texturematerial.EmissiveFactor=Color.Redmaterial.ScaleTextureMatrix( 500,500 )Self._ground=Model.CreateBox( New Boxf( -500,-1,-500,500,0,500 ),10,10,10,material )Self._bloom=New BloomEffectSelf._scene.AddPostEffect( _bloom )Self._fog=New FogEffectSelf._fog.Near=-15Self._fog.Far=12Self._fog.Color=New Color(0,0,.3)Self._scene.AddPostEffect( _fog )Local materiala:=New PbrMaterial( Color.Silver ,0)materiala.EmissiveFactor=New Color( 1,0,.5 )materiala.MetalnessFactor=0Self._donut=Model.CreateTorus( 2,.5,48,24,materiala )Self._donut.Move( 0,3,6 )End MethodMethod Init2D()Self._floor=Image.LoadBump( "asset::Slate Tiles II_D.png","asset::Slate Tiles II_N.png","asset::Slate Tiles II_S.png",.75,True )Self._2d_light=Image.LoadLight( "asset::cone_orange.png" )Self._2d_light.Handle=New Vec2f( .5,0 )Self._2d_light.Scale=New Vec2f( 1,1)Self._logo=Image.Load( "asset::Monkey2-logo-48.png" )Self._logo.Handle=New Vec2f( .5 )Self._logo.ShadowCaster=New ShadowCaster( _logo.Width/2,20 )End MethodMethod OnMeasure:Vec2i() OverrideReturn virtualResEnd MethodMethod OnRender( canvas:Canvas ) OverrideIf Self.install=False'Load GUI resourcesInitMainGUI()'Setup windowsSelf.my2d_window=Init2DWindow(canvas,Rect,300,200,1280,720)Self.my3d_window=Init3DWindow(canvas,Rect,100,100,1280,720)Self.about_window=InitAboutWindow(canvas,Rect,600,300,600,350)'Setup a generic window with canvas onlySelf.generic_window=New PWindow(canvas)canvas.AmbientLight=New Color(.25,.25,.25)Self.install=TrueEndif'Update 3D objectsSelf._donut.Rotate( .2,.2,.3 )Self._ground.RotateY( Sin(Millisecs()*.0001),True )'update 3D scene to windowmy3d_window.RenderWindowCamera(_scene,_camera)'Draw about window assetsRenderAboutWindow()'Draw 2D asstetsRender2DExample(my2d_window)'Update all windowsgeneric_window.UpdateWindow()App.RequestRender()End MethodMethod RenderAboutWindow()Self.about_window.DrawImage(Self.ap_logo,120,35)Self.about_window.DrawText("Alien Phoenix 2D / 3D Example",200,200)Self.about_window.DrawText("Powered by Alien Phoenix",220,220)Self.about_window.DrawText("Alien Phoenix copyright (c) 2018 Richard Betson",135,240)End MethodMethod Render2DExample:Void(window:PWindow)Local offsetx:Float=window.GetWindowWidth()/2Local offsety:Float=window.GetWindowHeight()/2Global viewRot:=0.0viewRot+=.001window.TranslateCanvas( offsetx, offsety )window.ScaleCanvas( Sin( viewRot*3 )*.25+1.25,Cos( viewRot*5 )*.25+1.25 )window.RotateCanvas( viewRot )Global lightRot:=0.0lightRot+=.02window.BeginLighting()Local mx:Float, my:FloatIf window.WindowActive()mx=(Mouse.X )-window.GetWindowX()my=(Mouse.Y )-window.GetWindowY()Elsemx=window.GetWindowWidth()/2my=window.GetWindowHeight()/2Endifwindow.AddLight( Self._2d_light, mx, my,4,4,8,8,8,lightRot )window.AddLight( Self._2d_light, mx, my,4,4,8,8,8,lightRot+Pi )window.AddLight( Self._2d_light, mx, my,4,4,8,8,8,lightRot+Pi/2 )window.AddLight( Self._2d_light, mx, my,4,4,8,8,8,lightRot+Pi+Pi/2 )For Local x:=0 Until window.GetWindowWidth() Step Self._floor.WidthFor Local y:=0 Until window.GetWindowHeight() Step _floor.Heightwindow.DrawImage( Self._floor,x-window.GetWindowWidth()/2,y-window.GetWindowHeight()/2 )NextNextFor Local an:=0.0 Until TwoPi Step TwoPi/8.0window.DrawImage( _logo,(window.GetWindowWidth()/2+Cos( an ) * window.GetWindowWidth()/4) -offsetx, (window.GetWindowHeight()/2 + Sin( an ) * window.GetWindowHeight()/4)-offsety )Nextwindow.EndLighting()End MethodMethod InitMainGUI:Void()Self.generic_window.LoadResources("system_resources/client_skin/window_skin.txt")Self.generic_window.SetScreenSize(1920,1080)Self.generic_button.LoadImages("system_resources/client_skin/client_skin.txt")End MethodMethod InitMenuWindow:PWindow(canvas:Canvas,rect:Recti,x:Float,y:Float,w:Float,h:Float)Local window:PWindow=New PWindow(canvas,rect,x,y,w,h)window.SetBorderStyle(BlendMode.Additive,.4,.4,.6,.8)window.SetResizable(True)window.SetMinWindowSize(150,150)window.SetCLS(False)window.SetWindowControls(New String[]("close","maximize","cast"),True)window.SetBackgroundImage(Null)Return windowEnd MethodMethod Init3DWindow:PWindow(canvas:Canvas,rect:Recti,x:Float,y:Float,w:Float,h:Float)Local window:PWindow=New PWindow(canvas,rect,x,y,w,h)window.SetBorderStyle(BlendMode.Additive,.4,.4,.6,.8)window.SetResizable(True)window.SetMinWindowSize(150,150)',5760+210,1080)window.SetCLS(False)window.SetWindowControls(New String[]("maximize","cast"),True)window.SetBackgroundImage(Null)Return windowEnd MethodMethod Init2DWindow:PWindow(canvas:Canvas,rect:Recti,x:Float,y:Float,w:Float,h:Float)Local window:PWindow=New PWindow(canvas,rect,x,y,w,h)window.SetBorderStyle(BlendMode.Additive,.4,.4,.6,.8)window.SetResizable(True)window.SetMinWindowSize(150,150)',5760+210,1080)window.SetCLS(True)window.SetWindowControls(New String[]("maximize","cast"),True)window.SetBackgroundImage(Null)Return windowEnd MethodMethod InitAboutWindow:PWindow(canvas:Canvas,rect:Recti,x:Float,y:Float,w:Float,h:Float)Local window:PWindow=New PWindow(canvas,rect,x,y,w,h)window.SetBorderStyle(BlendMode.Additive,.4,.4,.6,.8)window.SetResizable(False)window.SetMinWindowSize(150,150)window.SetCLS(True)window.SetBackgroundImage(Null)window.SetWindowOnTop()Return windowEnd MethodEnd ClassFunction Main()New AppInstanceNew PPhoenixWeb("Alien Phoenix 2D / 3D Example - Powered by Alien Phoenix",1920,1080)'device_width,device_height )App.Run()EndAttachments:
What the hell is going on?! That’s too easy!
I know; right? I was able to get Emscripten up and running easily. All with pre built binaries (no long compiles). I generally find it’s pretty easy to get Monkey going on on Linux desktop. I have a triple monitor setup (3×27″) and it’s all powered by Linux. I really have no complaints developing on Linux.
Alien Phoenix now supports mojo3d. OMG! Shown here with one window in 3D and another window with 2D lighting effects and both running real-time.
Attachments:
How long does that take to build on a decent machine
Well, zero.
I was able to use the Emscripten portable version which promptly downloaded and installed pre-built libraries/tools. After making a few simple changes I was able to build Emscripten modules and then compile my own code. All running great and, in, all three Emscripten build settings including WASM.
So here is what I did to get Emscripten compiling on Monkey using Linux Mint 18.3 MATE.
Install the following dependencies by entering this in terminal.
Monkey1sudo apt-get install build-essential cmake nodejs default-jre git-coreDownload the Linux version of Emscripten portable. Once downloaded you will need to extract it to a directory of your choice.
Next you will need to run the command line tool emsdk which is in the emsdk-portable directory. From your file manager open up the emsdk-portable folder and right-click and open up a console / terminal from that location. Then type the following into the console / terminal window.
Monkey1./emsdk updateNext enter the following to download and install SDK and Tools.
Monkey1./emsdk install latestNext activate the SDK
Monkey1./emsdk activate latestNext you will need to run the following script to set environment variables. IMPORTANT. Notice the ‘space’ between the two periods.
Monkey1. ./emsdk_env.shLastly you will need to modify env_linux.txt. Basically you need to modify the path to Emscripten. Here is mine.
Monkey123456'For emscripten builds, you need emcc, em++ and emar in your PATH.EMSDK=${HOME}/Programming/emsdk-portablePATH=${EMSDK}:${EMSDK}/clang/e1.37.28_64bit/binaryen/bin:${EMSDK}/node/4.1.1_64bit/bin:${EMSDK}/emscripten/1.37.28:${PATH}Remember to make sure the path in env_linux.txt for mini server is correct.
Thats it and the whole process should take less then an hour depending on your internet bandwidth. Once done you will need to build Emscripten modules for Monkey and then you should be able to compile Monkey code with Emscripten.
Cleanest I’ve seen yet, will probably do a clean install myself soon and give this a whirl.
All I did was install Mint 18.3 – MATE on a formated hard-drive and update the install at medium’ish level in Mint update. When I went through the updates I noticed a software upgrade for mesa. The MATE version and likely Linux Mint (and possibly repository builds like SDL2) include some of the dependencies needed. I literally installed each dependency one-by-one until monkey (fresh install) was built and compiling my stuff to the desktop. I was flat out surprised at how easy it was to get going.
I agree that providing a proven easy’ish path to Linux is a good thing. The one thing I encounter in Linux Land is over complication (well intentioned and wholly accurate) of the process. The one thing coders working on Windows or even OS X are looking for is an easy approach to starting out on Linux. I’m sure many would like to try it. They are undoubtedly looking for a step by step approach that get’s them going and compiling monkey code in a dependable forum that doesn’t blow their minds. I know from my experience that if you can dependably get up and running on Linux, start building your monkey project, and seeing great performance, dealing with the learning curve of Linux is easier. My experience with Linux Mint has been generally positive. It is by far the best distribution of Linux for those coders looking to jump into Linux.
I’ll let ya know how long it takes to compile the spectrum of Emscripten. My AMD Phenom X4 does a fair job of it. I’ll be installing GitHub as well as that is required to switch tools for example. A lot to do. At the moment I’m looking over the latest documentation. I’m Thinking tomorrow.

Hi,
I was able to compile Monkey on Linux Mint 18.3 – MATE with very few dependencies. The following was all that was needed (enter in terminal):
Monkey1sudo apt-get install g++-multilib libopenal-dev libpulse-dev libsdl2-devThats it. I so recommend using Linux Mint 18.3 MATE as the GUI/Desktop is very nice and everything just works on Linux Mint.
I will be installing Emscripten next. My plan is to produce a guide for Linux Mint 18.3 – MATE “Sylvia” as a starting point for users wanting to install Linux and setup up dependencies for Monkey. Keeping it to a specific version and distribution will make it easy for newbie Linux users. Linux Mint is a natural choice for new Linux users and is based/built on Ubuntu.
Off to install Emscripten.

Holy guacamole! Wow. Very nice. Good job Diffrenzy.
I have not forgot about you Adam. I’ve just got Linux Mint 18.3 (Ubuntu 16.04 LTS) installed and running on my system. I will be installing Monkey, Emscripten and other dependencies over the next few days. As soon as I get everything up and running I’l post a guide and answer any questions I can.
@All
Just FYI, if you are having problems getting Linux Mint 18.x running after install be sure to read the release notes about ‘ nomodeset ‘ . I have a Nvidia GTX 950 and the Nouveau driver will fail without replacing ‘Quiet Splash’ with ‘nomodeset’ as described in the Linux Mint release notes. Blame Nvidia and their driver policies.Hi Mark,
I am am now able to compile wasm and wasm+asmjs as well as asmjs. I have a recent version of Monkey from the develop branch on which I rebuilt Emscripten mods. There was a recent (like 3 or so days ago) update of cmake that was pushed through Mint update. I’m wondering if that is the cause for success. Whats interesting is that I am able to compile Emscripten using the sdk-master-64bit branch (from source) as well as the emscripten-1.37.1 tool (from source) .
Or, was this something you did? Either way I’m successfully compiling all three Emscripten options.
Adam, What version of Linux (Mint/Ubuntu) are you running? Which version of Monkey 2 are you using? How are you running the script in terminal (Ie: what are you typing in to get the script to run and have you changed the path in terminal to the script directory)?
Going to be away for a bit so will respond later today.
Adam, try compiling Ted2GO. For whatever reason (permissions look good, looking into this) using rebuildall.sh will build Ted2 but clicking on the icon does not launch it. If you goto the scripts folder (in your monkey2 directory) and run rebuildted2go.sh you should be good to go.
If you need help getting the script to run let me know.
@Playniax
Hey bud. Message me on my Phoenix USC FaceBook page. I have something I want to show you. -
AuthorPosts