Forum Replies Created
-
AuthorPosts
-
I’m working on a binary build – i’ve been away with folks so just getting back to things

That looks like a path error with a 32 bit version of mingw. Check the install page for how to install the correct 64but version here:
https://github.com/blitz-research/monkey2
Heres the text with the install bit for you:
Monkey123456789101112131415161718192021222324252627282930313233343536***** Building monkey2 on Windows *****1) Install the mingw-64 compiler. There is a self-extracting archive of mingw-64 that has been tested with monkey2 here:<a href="http://www.monkey-x.com/mak/devtools/i686-5.3.0-posix-dwarf-rt_v4-rev0.exe" rel="nofollow">http://www.monkey-x.com/mak/devtools/i686-5.3.0-posix-dwarf-rt_v4-rev0.exe</a>If you install this to the monkey2 'devtools' directory, the following steps should 'just work'.The general release of mingw-64 is available here:<a href="https://sourceforge.net/projects/mingw-w64/" rel="nofollow">https://sourceforge.net/projects/mingw-w64/</a>When installing, you should select 'i686' for 'architecture', 'posix' for 'threads' and 'dwarf' for 'exception'.2) Open a command prompt and change to the 'monkey2\scripts' directory.3) Enter 'rebuildall' and hit return. Wait...4) If all went well, you should end up with a 'Monkey2 (Windows)' exe in the monkey2 directory.5) You should now be able to build and run monkey2 apps. There is a simple 'hello-world.monkey2' test in the monkey2directory, and some simple demos in the '/bananas' directory.***** Building monkey2 on MacOS/Linux *****1) On MacoS, install the xcode command line tools. You can do this by entering 'xcode-select --install' in a shell.2) Open a shell and change to the 'monkey2/scripts' directory.3) Enter './rebuildall.sh' and hit return. Wait...4) If all went well, you should end up with a 'Monkey2 (...)' app in the monkey2 directory.5) You should now be able to build and run monkey2 apps. There is a simple 'hello-world.monkey2' test in the monkey2directory, and some simple demos in the '/bananas' directory.ok, the page itself has now been added to ted21
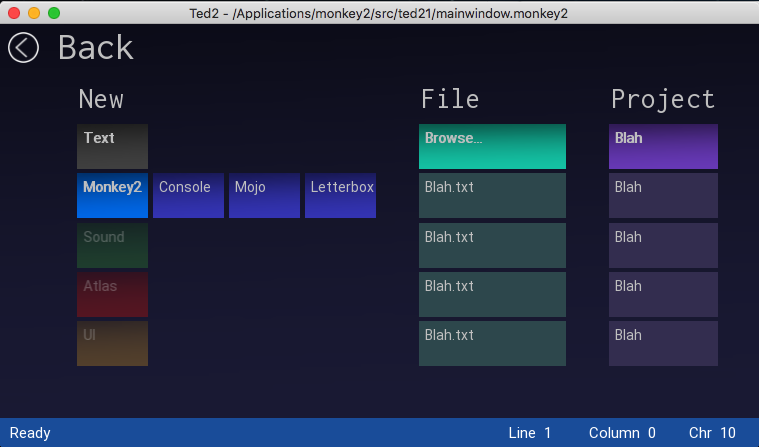
So when you click the new button/menu item/ctrl+n the ui will be replaced with the new document ui.
You will loose virtually all the ui; menus, documents, everything until you either press back or a new file type.
I’m now starting to hook up the actual page logic into ted21.
But (after the initial shock) everything works smoothly and very fast!
I’ve also added the ability to load recent files and projects to this page
Attachments:
Magenta is the os kernel that supports Fuchsia
it’s very early days with it, but… Mojo is the name of it’s io/communications system! So there may be issues with Monkey using mojo in the future?
Events. mmm.
Basically it’s only the main window that actually ‘gets’ events.
You then have some form of manager that allocates where (in your app) the events are going.
The best solution here is to track the current gui control and if the mouse is still in it – send it the event. if it’s not in it then you will need to run through each gui control and see if it is the control that wants the event.
Of course some events may be open to more than one control and some events may be directed to the current focussed control.
You will still have to create a manager to handle all of this though.
Games have a lot of cross over with events.
E.G. 1. a mouse click could also be a joystick button click which could also be a return key.
E.G. 2 joystick up/down could also be the same as arrow key up/down
Your manager should be intelligent enough to handle this automatically
The end result is a system whee the user has complete freedom to choose whatever input method they want to use.
The key thing with all of this is 1 Event send ONLY to the main window. you need to decide then what to do with it.
NOTE. MojoX has a primitive manager that will send events to the general relevant control
To finish – an event system is the most efficient system. because that is what is actually gong on behind the scenes. But you need to get your head around it first
all sorted and uberx removed – bye uberx
OK, that means I now have a fully operational replacement for mojox based controls.
I think the next step is to begin work on the sprite editor.
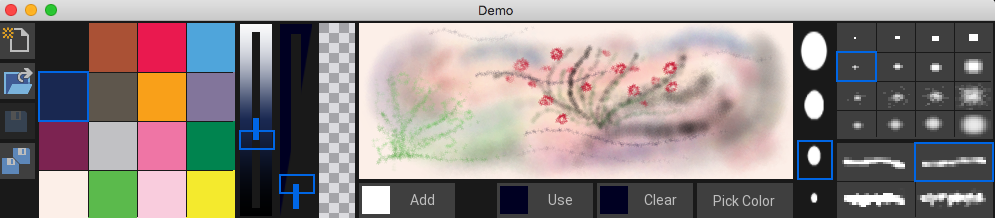
ok, just been converting the old mojox paint controls to the new oberon base controls.
Here is the result.
The first thing is the controls themselves are a bit more visually complex, allowing for a nicer look.
You can see the paint canvas now gives very subtle paint effect/mixes and I’ve also added a brush size slider next to the brushes.
The code itself is virtually the same apart from a couple of changes. But everything now flows correctly and also allows for hiding and showing of controls with no problems.
It’s been tested on V1.02 and V1.03 (with canvas and color additions) and works flawlessly
Next up is to take the code and replace the ted21 mojox version with the new oberon version
Attachments:
Quick update (OS X)
I did a very quick joystick test – just
_joystickDevice:JoystickDevice = JoystickDevice.Open( 0 )
to see what was reported and if it crashed.
It worked and correctly reported the attached joystick:
“Xbox 360 Wired Controller”
So I can deduce that your input joystick code is not really handling all situations for inputed joysticks, etc.
But on the good side – it works!!!
I use the keyboard.
When trying the joystick (D) the app just quit!
I’ll do some checking this end and report
Brilliant – worked flawlessly on my mac mini. Definitely retro heaven
yep that was my feeling. I tried a quick mod to mojo/app/events but it didn’t know anything about the touch finger
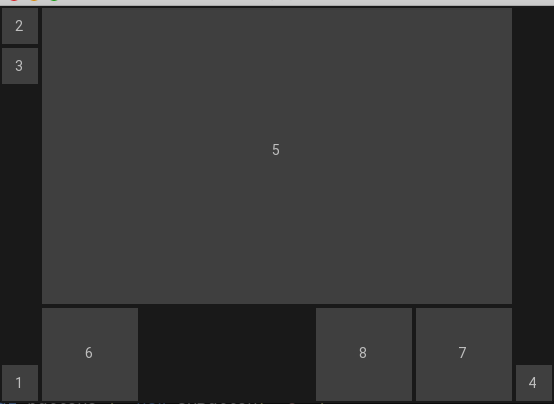
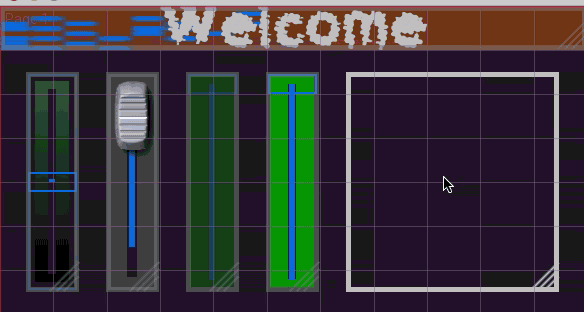
ok. now for some pixel accurate layouts. These have prefixed sizes, but will logical flow correctly
First look at the pic. It shows 8 controls (the grey blocks). Each block is numbered in the order it was added to the page
The order is important as it controls how the free space is allocated. In essence, add your fixed controls first followed by your floating ones.
In this demo there are tow fixed areas of 40 pixels on the left and right
The left has three buttons – two at the top and one at the bottom, the right has one at the bottom.
The rest of the space is filled with a top filled control and then one control filled to the left, and two filled to the right.
Have a look at the pic and reread this again.
OK. Here is the code itself:
Monkey123456789101112131415161718192021222324252627282930313233343536373839404142434445464748495051525354Method New()Super.New( "Demo", 840, 480, WindowFlags.Resizable )Page = New UXPageView( "Page 1" )' Page.SetGridX( 11 )' Page.SetGrid( 11, 7 )' Page.ShowGrid = TruePage.PageColor = Color.PicoBlack' Page.Designer = truelocal button1 := New UXButton( "1" )button1.SetPixelLayout( "leftbottom", 40, 40 )local button2 := New UXButton( "2" )button2.SetPixelLayout( "leftdown", 40, 40 )local button3 := New UXButton( "3" )button3.SetPixelLayout( "leftdown", 40, 40 )local button4 := New UXButton( "4" )button4.SetPixelLayout( "rightbottom", 40, 40 )local button5 := New UXButton( "5" )button5.SetPixelLayout( "topfill", 300 )local button6 := New UXButton( "6" )button6.SetPixelLayout( "leftfill", 100 )local button7 := New UXButton( "7" )button7.SetPixelLayout( "rightfill", 100 )local button8 := New UXButton( "8" )button8.SetPixelLayout( "rightfill", 100 )' button1.ShowGrid = TruePage.AddControl( button1 )Page.AddControl( button2 )Page.AddControl( button3 )Page.AddControl( button4 )Page.AddControl( button5 )Page.AddControl( button6 )Page.AddControl( button7 )Page.AddControl( button8 )'this needs to point to an active control to be used' Page.Focus = slider1ContentView = PageEnd methodWhich is very simple to understand and need no further lambdas or container panels to correctly resize things
Attachments:
-
AuthorPosts