Forum Replies Created
-
AuthorPosts
-
Super cool! Ran perfectly, and I managed to get to the end of the right side, when I finally flipped the rover upside down against the wall.

I think you comment out this line:
<textarea id="output" rows="10"></textarea>
Like this (apparently commenting out html is weird):
<!-- <textarea id="output" rows="10"></textarea> -->
I can’t get rid of a white bar under the canvas in full screen though.
My record so far, by the way…

Coming along really nice!
Here are some more (unsolicited…) suggestions!. The character spinning is a bit distracting, and it happens too often. Why not change its angle only on movement/action?
. It would be great if the camera animated quickly to the new location when the area changes, instead of teleporting. It’s a bit disorienting.
. Since I play in a laptop with the trackpad, it would be great if I had an alternative way to rotate the camera that allowed me to use the left hand, so that my right hand is always on the trackpad, the left hand always on the camera keys (I.e. Z and X keys, or something similar). Currently I have to move my right hand away from the trackpad, then back.
This would be a great mobile game, since the control scheme would work without compromise with touch controls. Are you planning on it?
Cheers.
I used BmGlyph+AngelFont module in the past, and it got the job done.
As an aside, TTF fonts + Shaders are a possible route in M2 if you want gradients and stuff like that! I mean, that’s basically what BMGlyph is doing internally before “baking” it. The main upside of using shaders in M2 would be the possibility of animating the shader, not to mention skipping one step to get the font.
Really cool!
Ran without issues in a 2015 Macbook pro mostly in full screen.A couple suggestions:
You could tone down the amount of flickering in the lights, it strobes quite a lot right in the BG now.
When you click on a tile that expands the set, it could have a different icon/color to indicate that.Cheers!
And if by “Erase” color you mean to make a color in an image transparent… that’s really not necessary anymore, simply export images as PNG files with transparency.
If you already have old images you’d like to use and you don’t want to change them using a graphics app… I guess you can make a monkey module that loads an image as a pixmap, specifies a color to be made transparent, finds all pixels in the pixmap that match that color and sets the color in those pixels to transparent and creates a new image from that pixmap…
…or you can just save the images as PNG with transparency!

Yeah, the alpha is just a color channel, like red, green or blue.
You can set is as part of the color, or separately using “canvas.Alpha = myAlpha”.Also remember that in openGL colors can have values higher than 1.0 – that’s HDR! Setting colors like that is essential to things like Glow shaders. It’s probably a good practice to not use UINT values of 0 to 255 unless you need to, and embrace colors as floating point values.
This:
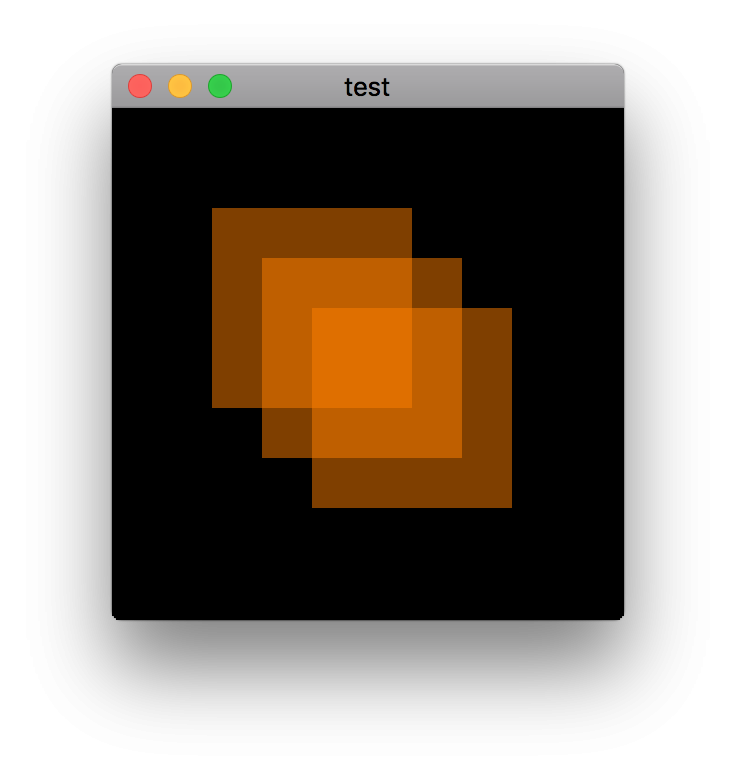
Monkey1234567891011121314151617181920212223242526272829303132Namespace myapp#Import "<std>"#Import "<mojo>"Using std..Using mojo..Class MyWindow Extends WindowMethod New()Super.New( "test",512, 512,WindowFlags.Resizable | WindowFlags.HighDPI )EndMethod OnRender( canvas:Canvas ) OverrideApp.RequestRender()canvas.Color = New Color( 1, 0.5, 0, 0.5 )canvas.DrawRect( 100, 100, 200, 200 )canvas.DrawRect( 150, 150, 200, 200 )canvas.DrawRect( 200, 200, 200, 200 )EndEndFunction Main()New AppInstanceNew MyWindowApp.Run()EndWill output three overlapping squares with transparency, like this:
 Monkey1234567891011Function ToRGBA:UInt( c:Color )Return UInt(c.R*255) Shl 24 | UInt(c.G*255) Shl 16 | UInt(c.B*255) Shl 8 | UInt(c.A*255)EndFunction FromRGBA:Color( rgba:UInt )Local r:=(rgba Shr 24 & $ff)/255.0Local g:=(rgba Shr 16 & $ff)/255.0Local b:=(rgba Shr 8 & $ff)/255.0Local a:=(rgba & $ff)/255.0Return New Color( r,g,b,a )End
Yeah, I’ve seen that too. Kinda funny.
Is there a way to pause a monkey app when it loses focus? Would it work on wasm target? I kinda remember Monkey-X having that.
Thanks guys!
I fixed some of the most noticeable problems on WASM (shadow flickering on pontoons, retina screens not working properly, etc) in the latest branch.
Not sure I’ll have time to write a full detailed breakdown, but the basic steps were:
Airplane
- Airplane was modeled and UV mapped in Houdini
- The scene graph was a bit complicated, since I really wanted all meshes in the same UV space (two materials only, one for the outside, one for the cockpit)
- Some parts had mirrored UVs, for maximum sharpness within the texture size.
- Exported as two FBX files, one low res (about 15K triangles) and one high res.
- The FBX files were not animated! All movement is added via code in M2
- The FBX was brought into Substance Painter
- High res normals were baked into the low res mesh
- lots of Pbr layers were created with multiple materials
- Once painting/shading was done, it was all exported to Color/Roughness/Metalness/Normal/Occlusion maps.
- Before bringing it to Monkey, I converted the low res FBX file to GLB using Clay Viewer. This step could probably be skipped, since I didn’t need animation and Painter exports to static Gltf. But I wanted to test a workflow that will allow animation in the future.
- Finally in Monkey2
- Materials were brought in using PbrMaterial.Load, which finds and loads all Pbr texture channels
- I made little extensions like Model.GetChild( name ) to facilitate “grabbing” a model from a hierarchy and doing things like replacing materials.
- Transparent objects need the Model.Alpha set in code (may not be needed with latest Clay viewer export, haven’t tested)
- Using GetChild I was also able to add movement to the ailerons and rudder.
- I made a “SmoothValue” class that not only gives me ease in/out, it behaves as if it has inertia, resisting movement change. That’s how the rudder and ailerons animation “overshoot” when they stop moving, for instance. It needs more work, though. Delta timing doesn’t feel right yet.
Those steps were repeated many, many times as I iterated on the model. Wash, rinse, repeat.
Monkey
Basically the same steps as the airplane, actually! Based on this tiny sketch:

I still want to rig this little guy so that I can pose him more convincingly like a toy!
The water was all Mark and his fancy water shader.For the future, I want an island you can fly around, and a better BG with a proper horizon (as if we’re in a large lake). Will get to it at some point, maybe if Mark revamps the terrain features.
Cheers!
Also, if you let the graph work its way to the end, then make the window smaller, the graph continue outside of the screen
Yeah, it needs more polish if it’s gonna be a module… I kept it basic for now just so I could keep moving.
Volunteers?not just for Mojo3D
If you comment out the Entity and Scene related lines it should work just fine in ‘vanilla’ Mojo.
Btw it seems to crash at canvas.DrawCircle( cursor+leftBorder, (-values[cursor] * scale) + h/2.0, 3 ) in debug mode.
Not crashing here! Are you in the latest dev branch?
and I like the Extension thing everytime I see it in use!
Yeah, it’s one of my favorite M2 features! I usually find it cleaner to add a method to an existing class instead of making up a new one or a new function that takes the object as an argument. Also makes it really easy to add recursion, as you can see in the Entity example.
Awesome! Time to scrap my w.i.p. serializer module. Good riddance…
- Airplane was modeled and UV mapped in Houdini
-
AuthorPosts
