Forum Replies Created
-
AuthorPosts
-
The name “unlit” is a little misleading!
It actually means that the texture is displayed at 100% of its original values, without any lighting applied (hence “unlit”), not that it’s 100% dark.
Those shaders tend to be super fast, are are super useful for stylized looks where all your shading/detail is built into the texture, like a “cartoon shader” minus the lighting.
Rendering a pure texture through the shader in Mojo is super easy for a 2D surface, but I still couldn’t get any custom shader to actually work with the 3D renderer… the Unity shader doesn’t really help in this case, but thanks!

Cheers!
Thanks Simon! Houdini has a somewhat steep learning curve, but the non-destructive workflow clicked with me and I’m enjoying it a lot, despite the constant google searches to see how to do basic things.
I’m actually considering simply authoring the materials in Houdini’s “Principled” shader (which is like a fancier version of Mojo’s PbrMaterial) using only the attributes that PbrMaterial also has, then simply exporting it to a custom format I can load in Monkey2 code. Visual differences should be minimal, and it’s much easier than making my own editor…
(I also filed a suggestion for a Houdini GLTF exporter. THAT would be much easier).
New Year’s Update!
Since I’ve decided to stick with GLTF file format and Houdini doesn’t export directly to it, it became clear I needed some sort of Material editor / Material library manager to allow reimporting of models while preserving material edits done after the first export. Any popular middleware (Unreal, Unity3D) allows this in some form.
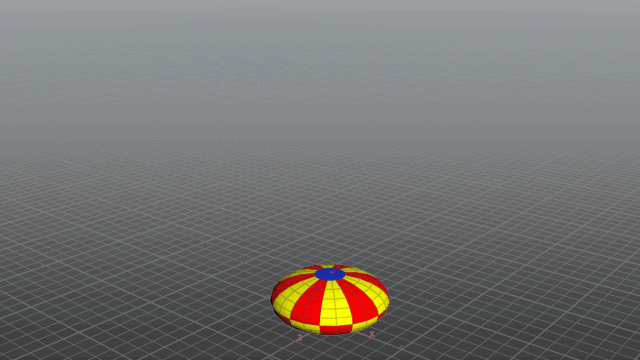
I decided to set other things aside for a moment and focus on creating a Material Editor / Model Viewer built from scratch with Mojo3D and MojoX. It will be similar to Qtek model viewer, but with functionality that allows not only editing a material, but also saving all materials in a model to an external .json file, and then reapplying it in case the model is re-exported from the 3D app. This functionality is being designed as a stand alone Module, and will be available outside the editor.
I have the basic skeleton working already, material libraries and all, and am spending most of my time figuring out MojoX. Here’s what the rough prototype looks like now:

As a bonus, I had to improve some things on my Serializer module (which allows saving/loading of Monkey2 object fields and properties to json files) to get the Material Libraries working, and hope to be able to share that module as well soon!
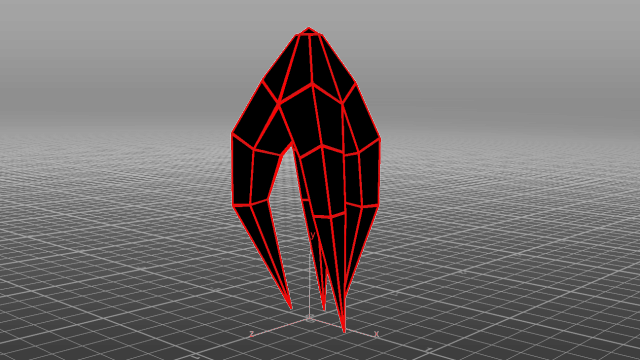
P.S. That airplane is a model I’m making in Houdini, and is about 90% procedural. You can move things around, resize parts, change cross sections, etc. Super fun to learn that stuff as well! Here’s the somewhat scary node graph for the airplane body (right click and open image in new tab for full resolution):

You want issues, you got issues!
https://github.com/blitz-research/monkey2/issues/304Thanks, and have a happy new year!
Are you testing it on Windows? Maybe it works in Windows but not in MacOS.
In MacOS the morpher example stretches as I resize the window around.That works for 2D, but doesn’t work for the 3D renderer!
See in the image below, the circle looks fine when I resize the window, but the sphere is rendered stretched.
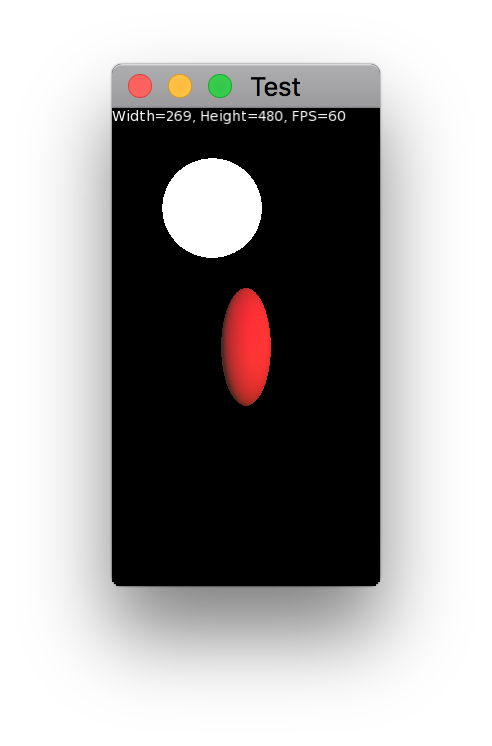
<edit> For some reason the forum’s layout is messed up, and there’s a giant box with the link on top of the text. What I said up there, in case you can’t see it like me, is “That works for 2D, but doesn’t work for the 3D renderer!”
Cool, seems like it works fine here!
The only reason the Walker model looks weird is because it’s intended to be a wireframe looking model, with no ambient light or environment map and emissive “wires”. Of course the PBR shader is not the best choice for that, but I was gonna deal with that later and try to write an “unlit” shader.
Cheers.
I’m still wrapping my head around character rigging in Houdini, so nothing really worth sharing yet. But I’ve been using these two test scenes to try out things like simple animated bones, animation without bones (just transforms) and multi-material objects:
Will post something more interesting when I have it.
The attached GLTF files appear to work properly with animation when loaded in Qtek viewer.Cheers!
Attachments:
I’m using this to convert from FBX, I believe it saves in GLTF 2.0 (with an additional .bin file, if that makes any difference):
https://github.com/pissang/qtek-model-viewer
Thanks!
Very cool!
There is an ABGR format
Thanks, I was wondering about that.
When I tried actual RGBA order I was getting the wrong colors and didn’t know why!I’m not passing texture coordinates or an image, just the vertex coordinates and the colors for each vertex.
You could turn this into a function that draws the primitive using rotation, etc.Notice that you can have each vertex a different color to get a 4 color gradient!
Monkey1234567891011121314151617181920212223242526272829303132333435363738394041Namespace myapp#Import "<std>"#Import "<mojo>"Using std..Using mojo..Class MyWindow Extends WindowGlobal verts:= New Stack<Float>Global colors:= New Stack<UInt>Method New( title:String="Gradient",width:Int=800,height:Int=600,flags:WindowFlags=WindowFlags.Resizable )Super.New( title,width,height,flags )'vertex pairs: top left, top right, bottom right, bottom leftverts.AddAll( New Float[]( 100, 100, Width-100, 100, Width-100, Height-100, 100, Height-100 ) )'colors: same order as vertex pairscolors.AddAll( New UInt[]( RGBA( Color.Red ), RGBA( Color.Yellow ), RGBA( Color.Yellow ), RGBA( Color.Red ) ) )ClearColor = Color.DarkGreyEndMethod OnRender( canvas:Canvas ) OverrideApp.RequestRender()canvas.DrawPrimitives( 4, verts.Length/8, verts.Data.Data, 8, Null, 8, colors.Data.Data, 4, Null, Null )EndEndFunction Main()New AppInstanceNew MyWindowApp.Run()EndFunction RGBA:UInt( c:Color )Return UInt(c.a*255) Shl 24 | UInt(c.b*255) Shl 16 | UInt(c.g*255) Shl 8 | UInt(c.r*255)EndHi, Sorry if that was confusing! Maybe I should remove the reference to the book to make it less confusing.
I wasn’t trying to translate the book’s examples one by one, I was just experimenting with how to achieve certain things using Monkey2 (transparency, passing variables to the shader, using textures, etc) and was using the book as a rough guide.
For instance, example 2 uses Canvas.Color, which is something specific to Mojo and isn’t mentioned in the book, which is about WebGL using a javascript library. But as far as I can tell, all examples they have are completely doable in Monkey2.
I recommend simply doing the book’s examples in their website without worrying about Monkey2, then taking a peek at the M2 code just as examples on how to solve some specific problems using Mojo.
That’s really neat, thanks!
I feel like I still don’t take full advantage of first class functions, even though I understand how they work now. It’s a constant exercise of getting used to new design patterns. Probably good for my brain, though!
December 1, 2017 at 4:03 am in reply to: Rotation and Draw Primitives at Virtual Resolutions using native res? #12049The current behavior seems correct to me!
Virtual resolution is about relative sizes (and aspect ratio), not about the resolution itself. Doing the two step, “render to texture then draw texture” seems to be the correct path to draw “actual” low res images at a high resolution monitor, I think.
If you really don’t want to deal with it, you can extend the Window class into a window that does the texture rendering “behind the scenes”. You can even switch between low res and high res on the fly while maintaining the framing and size of everything, which is neat!
Cheers!
-
AuthorPosts
