Forum Replies Created
-
AuthorPosts
-
Awesome example, @pixelpaladin! Thanks!
I’m actually getting the same errors as @therevills on MacOS. Maybe it’s because I’m using the latest dev branch?
So you used a single-pass approach. Multi-pass would be faster
Baby steps! Until a couple weeks ago I wouldn’t even know where to start if someone asked me how a shader works… :-)… Multi-pass here would actually be ideal, since the glow should happen on the image after the scanlines and shadow mask are applied. Any pointers on how exactly I’d make it happen? For instance, where do you store each pass resulting texture, and how do you use it on the next pass? Is it just updated on the m_ImageTexture0 itself?
Somehow my biggest problem with monkey2’s mojo is that I cannot pass values to shaders
I didn’t get that part. Can’t you pass values using methods like Image.Material.SetFloat?
Cheers.
The glow was a pain, took me something like 2 or 3 nights fiddling with the code and the parameters to get it to look right. This is what I got in the end:
C1234567891011121314151617181920vec3 glow( sampler2D image, vec2 uv, float glowRadius, vec2 res ){vec3 result = vec3( 0.0, 0.0, 0.0 );vec2 pixSize = vec2( 1.0/m_Resolution.x, 1.0/m_Resolution.y );float glowRadiusUV = glowRadius * pixSize.x;int samples = int(glowRadius)*2;int halfsamples = samples/2;for( int x=-halfsamples; x<=halfsamples; x++ ){for( int y=-halfsamples; y<=halfsamples; y++ ){float posX = float(x)/float(halfsamples);float posY = float(y)/float(halfsamples);float xoffset = posX*glowRadius*pixSize.x;float yoffset = posY*glowRadius*pixSize.y;float fade = 1.0 - (abs(posX)*abs(posY));result += ( texture2D( image, vec2( uv.x + xoffset, uv.y + yoffset ) ).rgb * fade );}}return result;}The number of X and Y samples increases automatically when the glow size is larger, so it gets very expensive very quick. 2.0 seems like a good amount for an Ok looking glow with a reasonable performance (runs on a 2880×1800 image at 60fps on a laptop with intel graphics).
But the trick that actually helped a lot was to “pre-mix” the glow with the main color using “max( color, glowColor * 1.5 )” before doing the additive mix. This “fills” the dark spaces between pixels more, and makes the glow more visible without making the image much brighter. Have a look at the full glsl code here:
https://github.com/DoctorWhoof/Mojo-Shader-Tests/blob/master/shaders/test07_CRT.glsl
It’s kinda messy, I don’t really know what I”m doing!
Cheers!Thanks for sharing!

I also updated my shader tests repository with my latest CRT shader. Still needs some tweaks, but it’s very customizable, and is already working pretty well for an “arcade monitor” style image. It has features like variable width scanlines, soft glow, color correction and image filtering on a single axis.

There’s also a “useful functions” .glsl file in the shaders folder, with functions I found while googling around, with credits for each one.
https://github.com/DoctorWhoof/Mojo-Shader-Tests
Cheers.
Try the latest one. Just made some modifications with today’s M2 dev branch. Example 08 never worked, I just replaced it with an improved CRT “beam renderer” test. Now the scanline ends are more rounded, and the color blur looks better. Beam rendering still needs some tweaks before I add curvature.
There’s something wrong with 4 – it compiles fine, but the shader has a weird red noise. Will look into it tomorrow.
@hezkore – and I cant compile your example either
That one is probably just the shader file name wrong somewhere, since those tags seem correct.
That said, you seem to be in Windows, and I’m too lazy to boot in Windows to test it!
Awesome, thanks! This is exactly what I was asking!
Will give it a try when I get home later today.
I know that’s pretty basic, but how do you “feed” the canvas texture into the shader (in other words, how do you access it on the shader side so you can get the RGBA value of each pixel before you manipulate it)?
In my case, I have a
Monkey1uniform sampler2D m_SharpTexture;in the shader that needs to be updated on every frame. Is there a better way?
Yeah, I haven’t tried it yet.
I wonder if there’s a way to “run” the shader on the image.Texture itself, instead of passing a new texture via image.Material.SetTexture like I’m doing here.
Then again, maybe doing it like this is fast enough? You could render to an image canvas, then “feed” that image texture into the shader on every frame, then simply draw that back into the main canvas. Haven’t had time to test it out yet, but my guess is that it’ll be a little slow (I’m aiming for hidpi, so something like 2880×1800 at 60fps would be necessary).
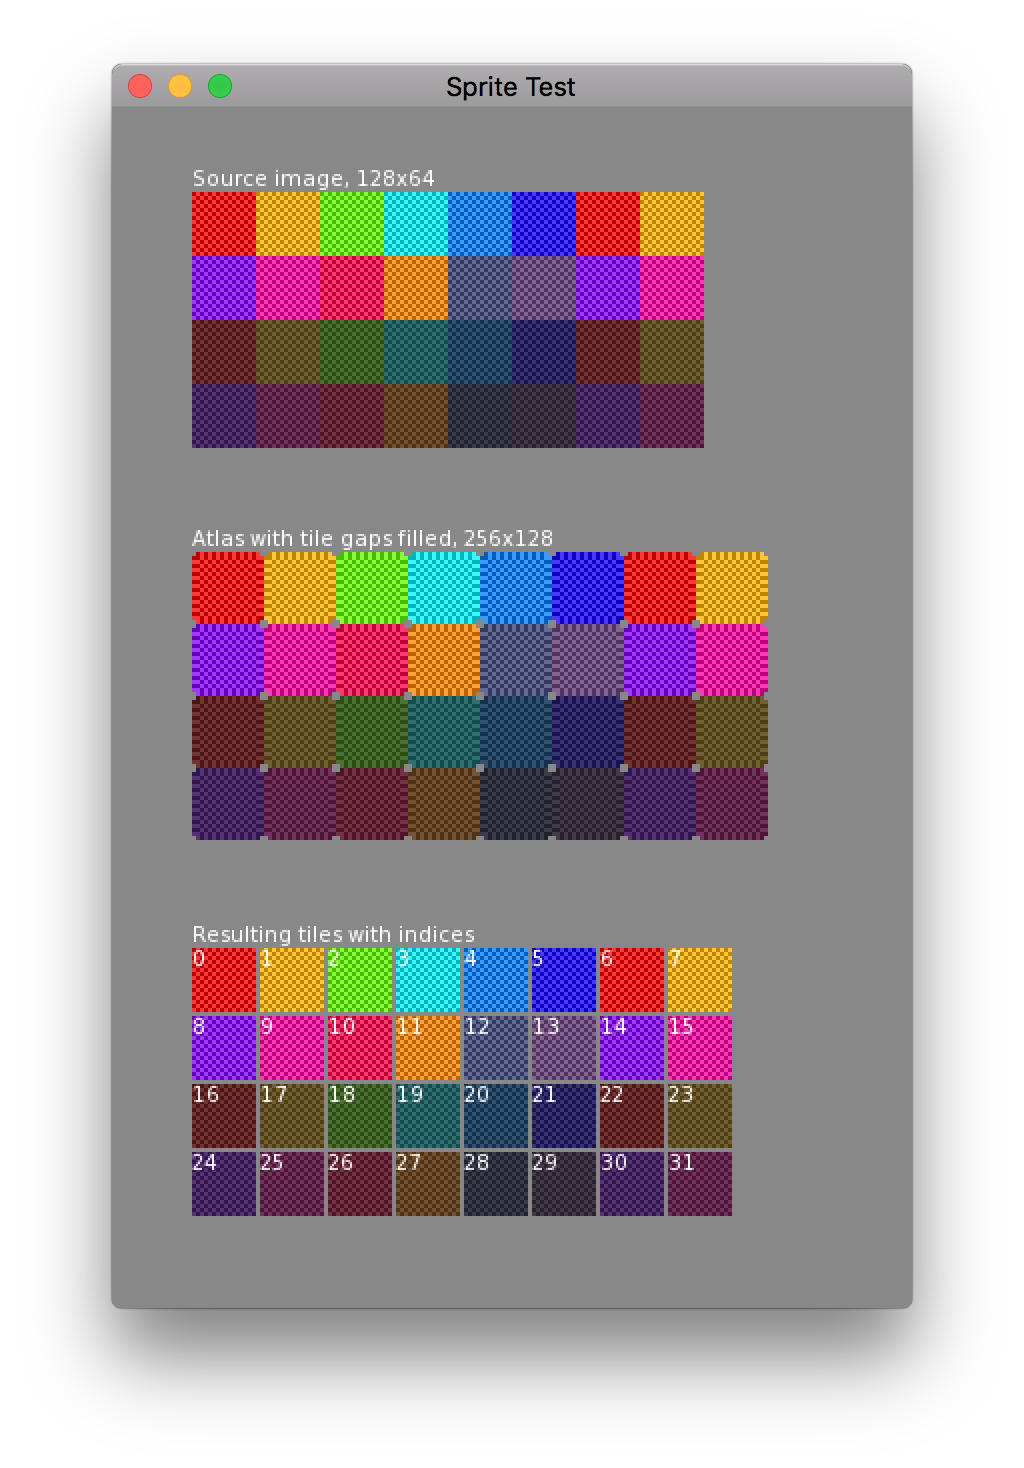
Using ints will solve it, but sometimes you want fractional coordinates (i.e. HD sprites, non “retro” 2D games).
For those cases, the only solution I know of is to add a gap between each tile, and copy the color of each edge pixel to the corresponding gap pixel.
I used to do this using Photoshop actions, but it was really annoying since you had to keep two sets of images – the original ones, and the ones with the colored gap…
…So I made a Monkey module to deal with that “on the fly”! (this feature is still alpha)
https://github.com/DoctorWhoof/spriteToolsHere’s how it works:
Once you load a PNG file, the Atlas class internally generates the gaps between tiles, even if they were created without gaps, and creates a texture atlas from that. You can then use Atlas.Cells[ index ] to access each individual image.And as a bonus, it converts any source image file into a “Power of Two” sized atlas, more guaranteed to work in all kinds of GPUs without artifacts like unwanted scaling.
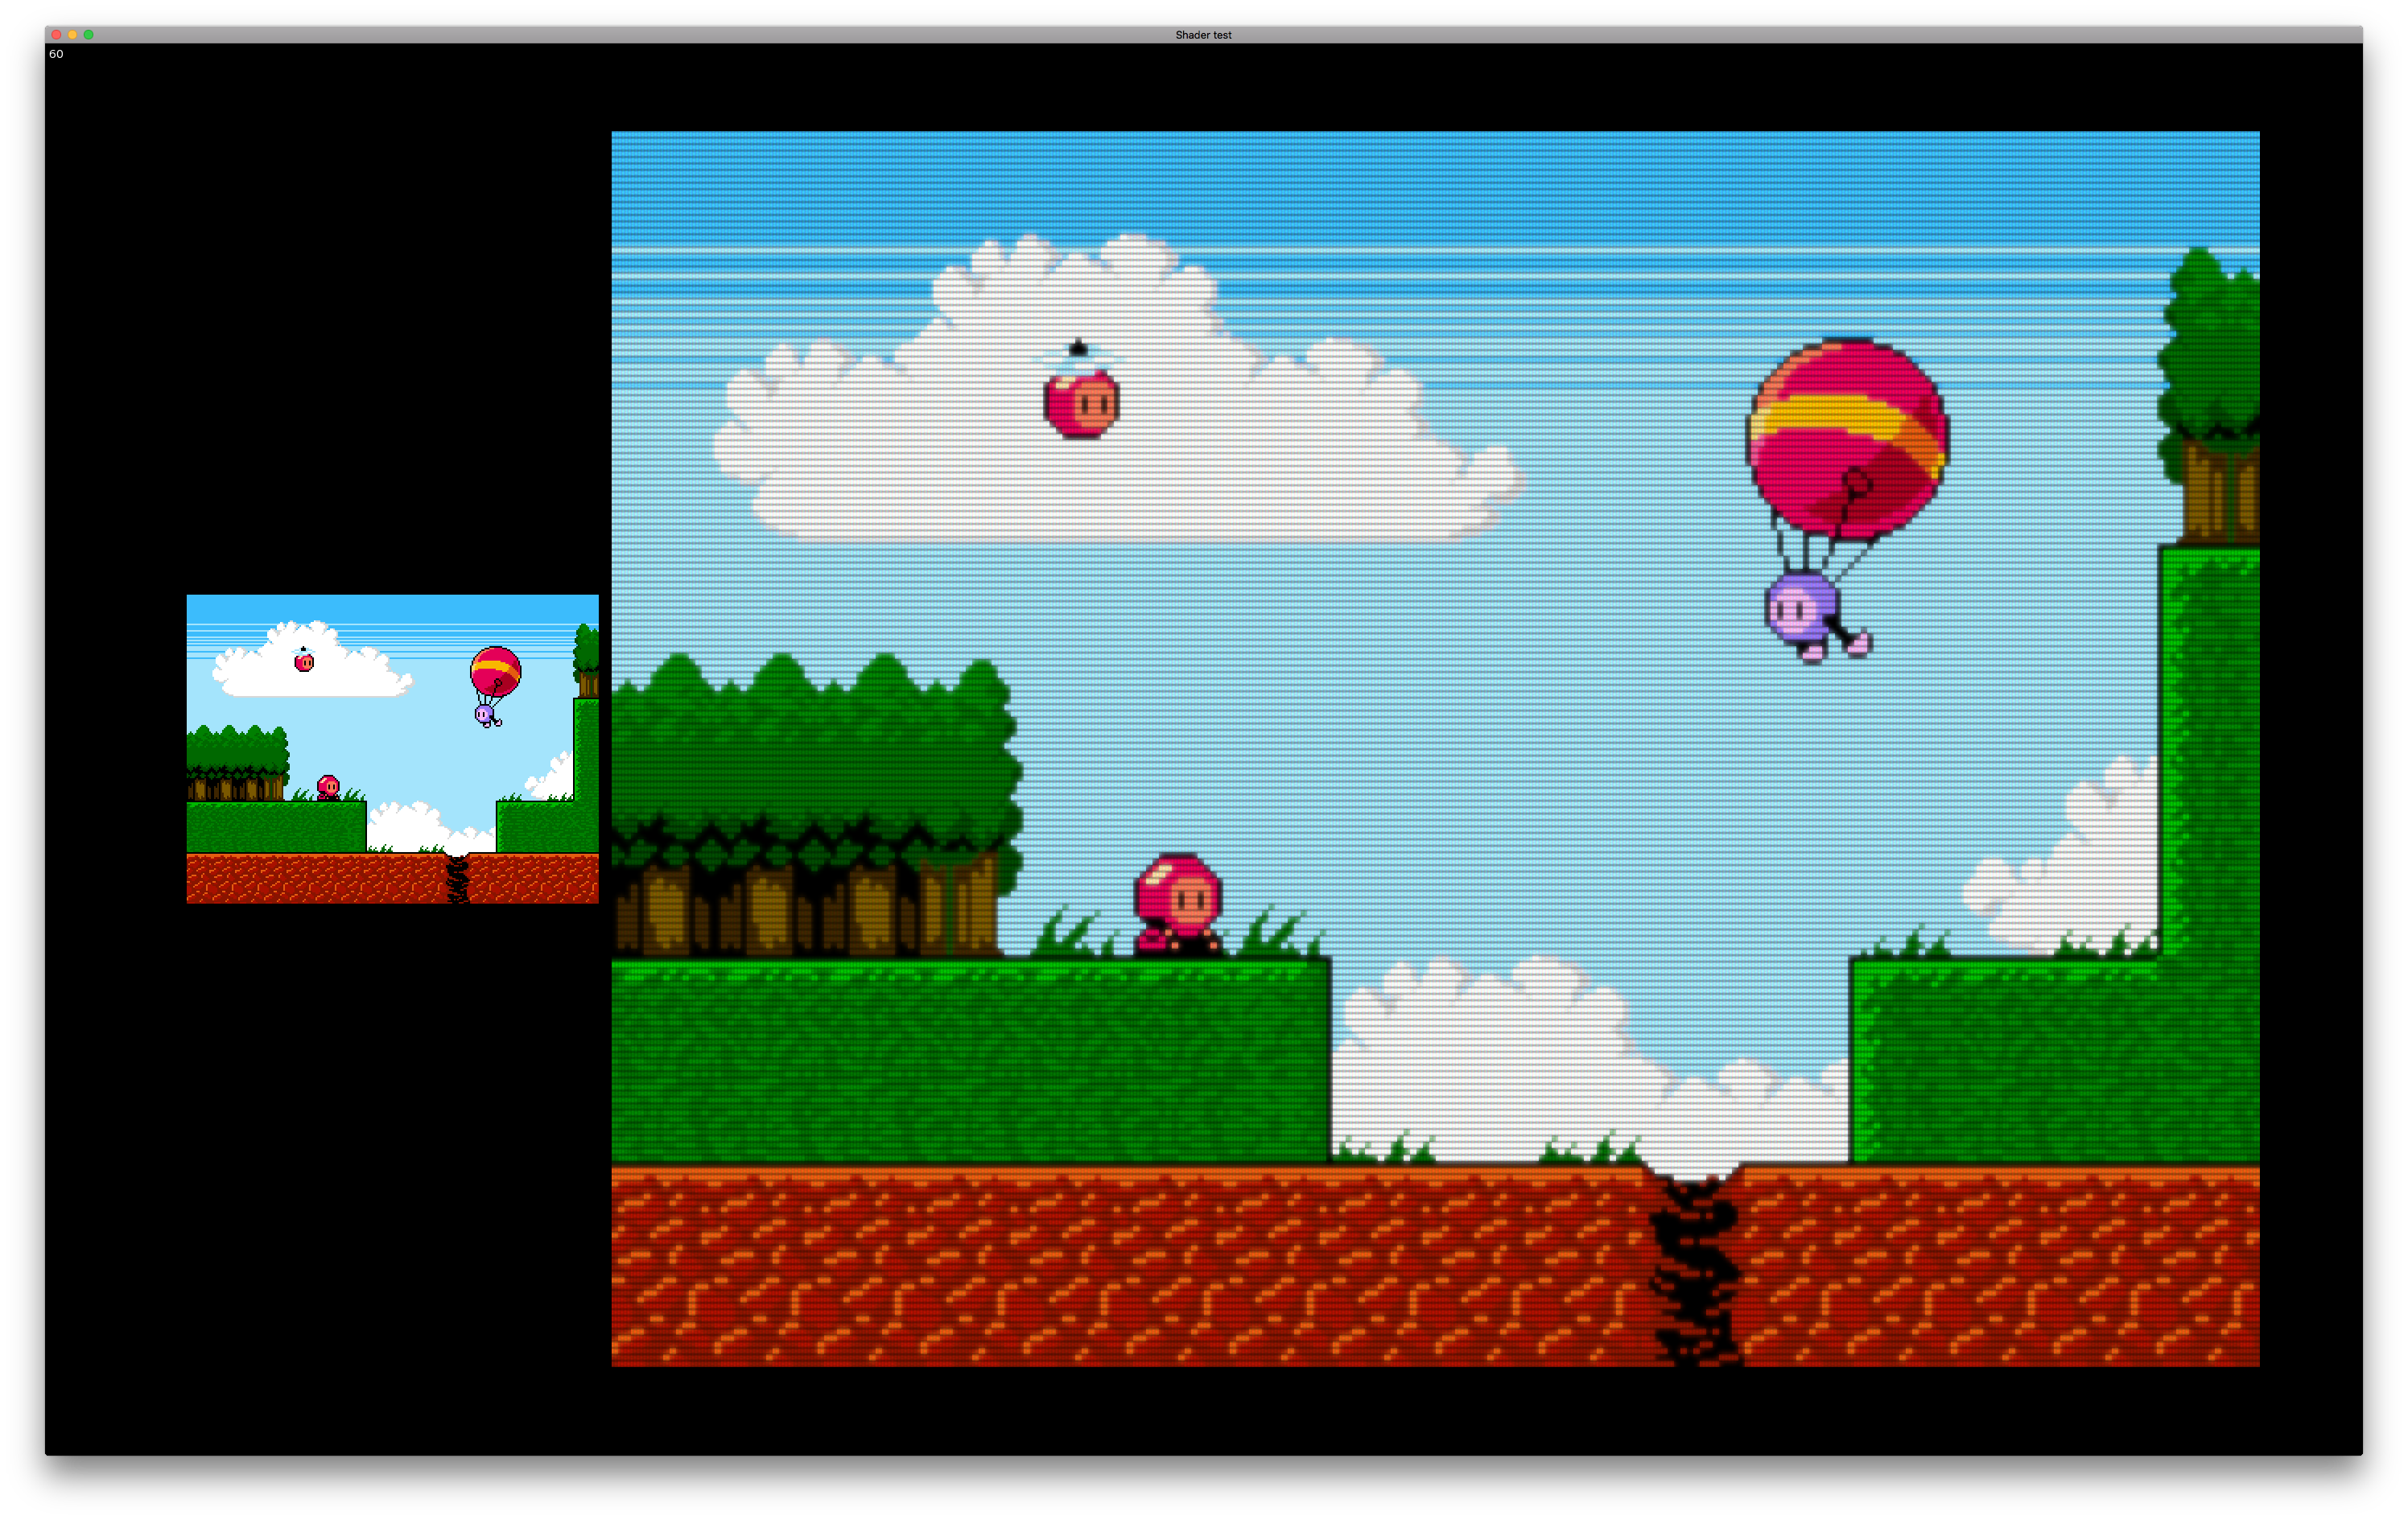
Totally untested in real production! Let me know if it works.Not the same shader, but I just made a CRT shader while “forcing” myself to learn shaders & mojo…
Still WIP, and does not offer curvature/rounded corners yet, but shouldn’t be that hard to implement.https://github.com/DoctorWhoof/Mojo-Shader-Tests
Test 7 is the CRT test.
Have NOT tried this feeding an animated image, though. Have no idea how it will perform…Here’s how it looks in action. Textures are optimized for HiDPI screens like a MacBook Retina monitor. There will be texture scaling in lower resolutions, resulting in a messier shadow mask (the RGB dots on a CRT monitor) pattern.
(right click and “open image in new tab”, then zoom in to see full resolution)
80 fps seems slow, you should be able to draw thousands of copies before hitting that frame rate. How many copies are you drawing?
Rendering to an image canvas can be slow without the “Dynamic” texture flag. Are you using it?
I actually get the exact result on my version and on Mark’s, 44K on AMD GPU and 30K on Intel on a Mac laptop. Of course it’s better to get the same result with less code!
By the way, for the tests to look absolutely identical, you need to change this line:
Monkey1frames[ j*2+i ]=New Image( atlas,i*32,i*64,32,64 )Into this (using the ‘j’ coordinate for vertical axis to actually use all four frames, plus centered handle):
Monkey12frames[ j*2+i ]=New Image( atlas,i*32,j*64,32,64 )frames[ j*2+i ].Handle = New Vec2f(0.5)Cheers!
Try the new one!
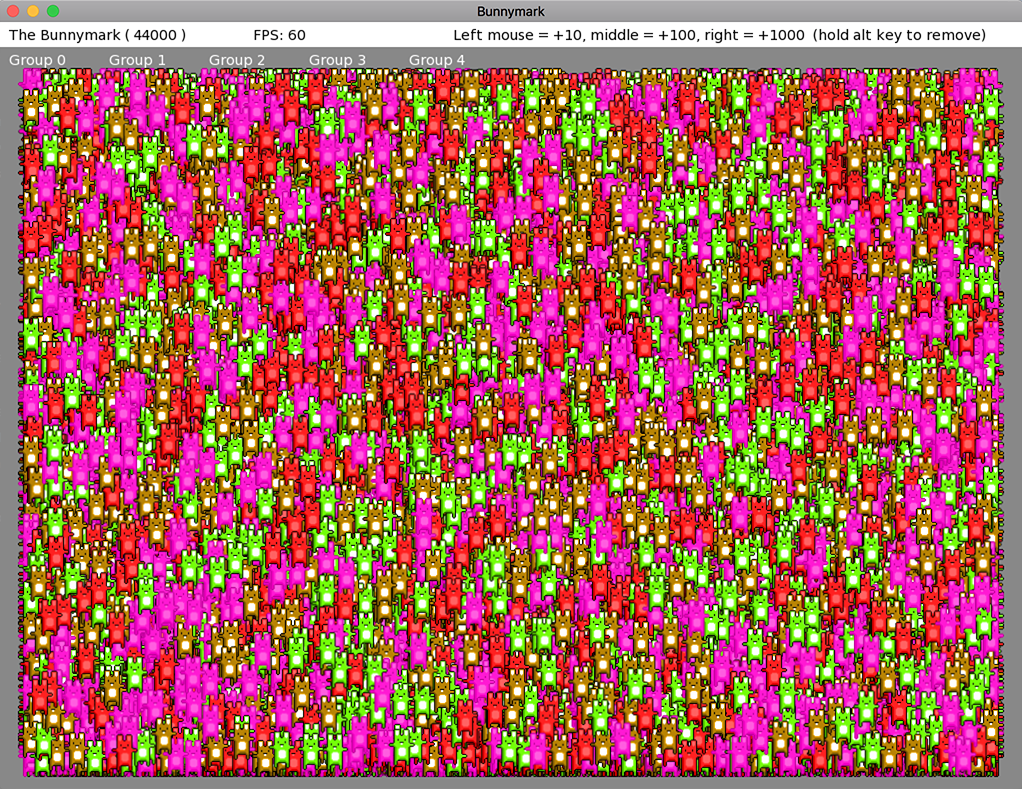
https://github.com/DoctorWhoof/Monkey2-BunnyMarkI added “proper” sprite batching, using Canvas.DrawPrimitives, and can now go up to 44000 on my laptop, a near 3X faster result!

If I switch the GPU to Intel Iris instead of the faster AMD Radeon R9 it’s still pretty good, around 30000. All on MacOS High Sierra. Curious to see the difference on Windows.
Instead of calling each Bunny.Draw, I now call bunnyAtlas.DrawBatch() a single time. Each bunny still updates a render queue with bunnyAtlas.QueueSprite( x, y, frame ). Take a look!
The only bummer is that I hit some DrawPrimitive() limit (something around 16000 primitives, I believe) and had to group the render queue into smaller groups, so the code isn’t as clean as it could be.
I wanna play too!
I forked the original, and added a simple Atlas class so we can batch all four bunnies with a single texture, without worrying about bunny order. Also added borders and made the bunnies bounce on top, to ensure we’re seeing all bunnies at any time (and cleaned the git ignore settings a bit).
Other changes include ditching the bunny array and using a stack instead, to avoid resizing the array all the time.
https://github.com/DoctorWhoof/Monkey2-BunnyMark
I get about 16000 bunnies on my MacBook Pro 2015 before the framerate starts to get unstable.

The enemies are a lot tougher now! Cool stuff.
You should consider adding “Robotron” style shooting, where the shooting direction doesn’t have to match the player direction (let’s say, cursor keys for movement and WASD keys for shooting in 8 directions, or dual analogue sticks like Geometry Wars), I think the core shooting mechanic would be more enjoyable!
Cheers!
-
AuthorPosts
